-
1er mai


Colybrix, thank you very much for your permission that I may translate your tutorials

Tutoriel original ici
***

***
Plugins
Mura Meister perspective tiling
Eye candy impact perspective shadow
***
Foreground color #99c81a
Background color #40550a

***
I advise you to do the tutorial with the image provided and the tube vase muguet34 to have the same background, then colorize according to your colors
Can be done with other images but the colors will not be the same
***
1 - Open Alpha layer – Window / duplicate
We work on the copy
Selections - Select all
2 - Open "fond muguet" - Edit - Copy
Edit - paste into selection
Selections - Select none
3 - Adjust - Blur - Radial blur

4 - Effects - Texture effects - Blinds - foreground color

5 - Layers - New layer
Selections - select all
Open "vasemug34-coly" – Erase the watermark - Edit - Copy
Edit - Paste into selection
Selections - Select none
6 - Adjust - Blur - Radial blur - same settings
Blend mode Overlay
Layers - Merge - Merge down
(now you can colorize according to your colors)
7 - Effects - Reflexion effects - Kaleidoscope

8 - Selections - Load - Save selection - Load Selection 1 from Alpha Channel

9 - Selections - Promote selection to layer
Effects 3D Effects - Drop shadow

Selections - Select none
10 - Layers - Duplicate
Image - Flip
Layers - Merge - Merge down
11 - Layers - Duplicate
Image Mirror
Layers - Merge - Merge down
12 - Selections - Load - Save selection - Load Selection 2 from Alpha Channel
Move on the bottom layer - raster 1
Selections - Promote selection to layer
Selections - Select none
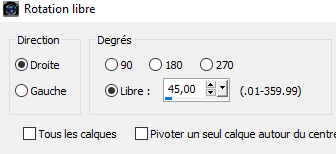
Image - Free rotate – right - free 45
13 - Move to the bottom layer - raster 1 - duplicate
Layers - Arrange - Bring to top
Effects - Mura's Meister - perspective tilling (Height à 10)

14 - Selections - Load - Save selection - Load Selection 3 from Alpha Channel
Delete (suppr) X 2
Selections - Select none
15 - Move to raster 1 (at the bottom)
Layers- New layer
Fill with white color
Layers – New mask layer from image – select Narah 1114
Effects - Edges effects - Enhance
Layers - Merge - Merge group
Blend mode Overlay - Opacity 53%
16 - Move at the top
Open "vasemug35-coly" - Erase the watermark
Edit - Copy
Edit - Paste as a new layer
Image - Resize 50% Resize all layers – not checked
Move right
17 - Effects - Eye Candy Perspective shadow, - Settings chose Reflect Behind

18 - Effects - 3D Effects - Drop shadow

19 - Open "LF-Flower-04042015" - Erase the watermark
Edit - Copy
Edit - Paste as a new layer
Image - Resize 50% - Don't move !
20 - Effects - 3D Effects - Drop shadow

21 - Open "butterfly 3"
Edit - Copy
Edit - Paste as a new layer
Image - Free rotate

Pick Tool (K)
Position X 588
Position Y 138

22 - Layers - Dupliquer - Move to the original (raster 4)
Adjust - Blur - Motion blur
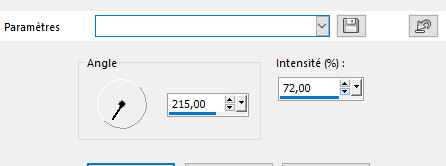
(on my version 2 - I did 2x the motion blur effect and put the layer in screen mode opacity 57%)
Your layers

23 - Image - Add borders 2 px dark color
24 - Selections - Select all
Image - Add borders 30 px white color
Drop shadow in memory
25 - Selections - Select none
26 - Open "deco cadre"
Edit - Copy
Edit - Paste as a new layer - Don't move !
27 - Open "femme323-coly" - Erase the watermark
Edit - Copy
Edit - Paste as a new layer
Image - Mirror
Image - Resize 78% Resize all layers – not checked
Move to left
28 - Effects - 3D Effects - Drop shadow

29 - With the font provided or another one of your choice, write your text
My settings

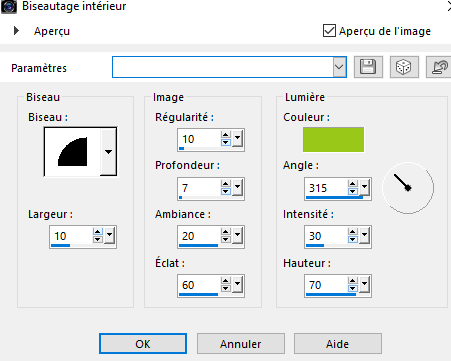
30- Effects - 3D Effects - Inner Bevel
31 - Effects - 3D Effects - Drops shadow

32 - Image - Add borders -2px dark color
Add your watermark
33 - Image – Resize 900 pixels - Resize all layers checked
Adjust - Sharpness - Sharpen
Save as Jpg
If you want, you can send me your version
If you have problems, or you find a not worked link, write to me

Une autre version avec un tube de femme de Colybrix et 2 tubes déco de Krys et Mirabelline

-
Commentaires
|
|
|
|