-
Coucher de soleil
Coucher de soleil

Colybrix, thank you very much for your permission that I may translate your tutorials

Tutorial here
***

***
Plugins
Mura’s Meister
Graphic Plus
***
Colors
Foreground #1a224b
Background #e1d4f1

***
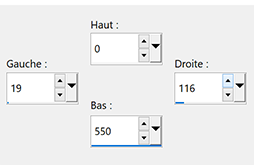
1 - File - New transparent 900 x 550 pixels transparent
Selections – Select all
2 - Edit – Copy "04024_tanjungarusunset_2560x1440"
Edit – Paste into selection
Selections – Select none
3 - Layers - Duplicate
Layers – Load/Save mask - Load Mask from Disk
Choose mask 20/20

Layers - Duplicate
Layers - Merge - Merge group
4 - Close this layer
Activate Raster 1
Adjust - Blur - Gaussian blur 30
Effects - Image effects - Seamless tiling - Side by Side

5 - Adjust - Add/Remove Noise - Add Noise

6 - Layers – New Raster layer
Fill with the light color or White color
Layers – New mask layer from image – select "160_Masque_ForumChezVioline"
Effects - Edges Effects - Enhance
Layers - Merge - Merge group
Blend Mode Overlay
7. - Layers - Duplicate
Image – Mirror Horizontal
Blend Mode Overlay - Opacity 50
8 - Activate bottom Layer (Raster1)
Layers - Duplicate
Effects - Mura’s Meister - Pole Transform
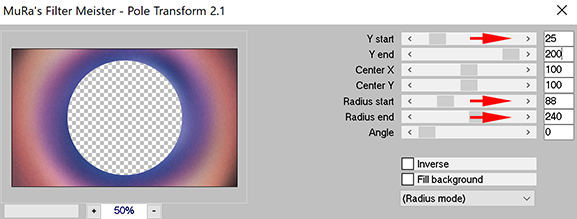
Blend mode Overlay
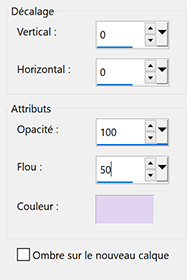
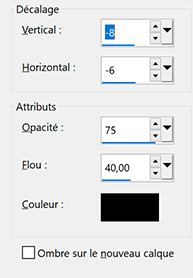
Effects - 3D Effects - Drop shadow - Black color

9 - Effects - Texture Effects - Blinds (Dark color)

Layers - Arrange - Bring to top
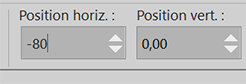
10 - Pick Tool (k)
Position X -80
Position Y 0
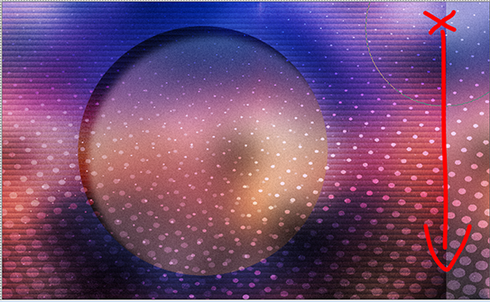
11 - Erase Tool - Round Brush - Settings

Click up and go down to the bottom - 3-4 times if necessary to erase the clean cut
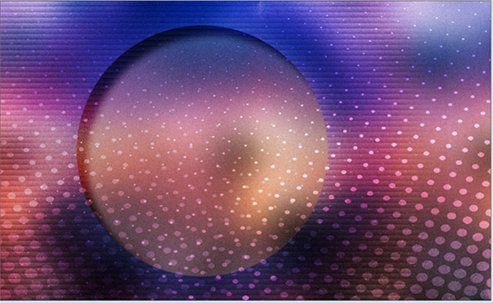
Result
12 - Activate Group - copy of raster 1 and open it
Move to the center of the circle if necessary
For my version - Pick Tool (k)

13 - Activate Top Layer
Layers – New Raster layer
Select Tool (S) – Custom Selection
14 - Flood Fill Tool - Opacity 30
Fill with White color
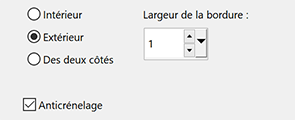
Selections – Modify - Select Selections Borders
15 - Flood Fill Tool 100
Zoom in - Fill with white color
Selections – Select none
16 - Blend Mode Overlay - Opacity 75
Layers - Duplicate
Image - Resize 90% - resize all layers not checked
Adjust - Blur - Gaussian Blur 10
Blend Mode Dissolve - Opacity 20
17 - Effects - Image effects - Seamless tiling - Side by Side (same settings)
18 - Edit – Copy special - copy merged
19 - Image – Add borders
2 pixels – Foreground Color
Selections – Select all
Image – Add Borders
40 pixels –no need to change color
20 - Selections - Invert
Edit - Paste into selection
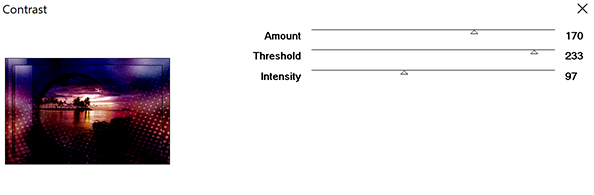
Effects - Graphic Plus - Contrast
Adapt ths first number - the higher the number, the darker the result
21 - Selections - Invert
Effects - 3D Effects - Drop shadow - Light color
Selections - Select none
22 - Edit - Copy "femme830-coly" - Erase the watermark
Edit - Paste as a new layer
Image - Mirror horizontal
Image - Resize 77% - resize all layers not checked
Move to the right
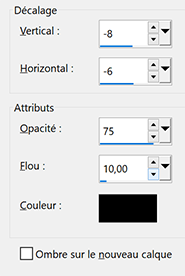
Effects - 3D Effects - Drop shadow - Black color
23 - Layers - Duplicate
Activate the bottom tube
Adjust - Blur - Gaussian blur 30
Blend mode Multiply - opacity 85
24 -
Edit - Copy "deco fleurs"
Edit - Paste as a new layer
Image - Resize 70% - resize all layers not checked
Pick Tool (K)
Position X 25 - Position Y 45
Effects - 3D Effects - Drop shadow - Black color
25 - Add your watermark
Image – Add borders
2 pixels – foreground color
Image – Resize 950 pixels - resize all layers checked
Save Jpeg
If you want, you can send me your version
If you have problems, or you find a not worked link, write to me

Une autre version avec un tube de Tine et un tube fleur de Cal

Une autre version avec un tube de Maryse

Muito obrigada Roberta

-
Commentaires
|
|
|
|