-
Douceur de septembre


Colybrix, thank you very much for your permission that I may translate your tutorials

tuto original ici
****

****
Plugins
VM Natural
AAA Frames
****
Colors

Foreground #3f1f12
Background #efda85
1 – Open a new transparent image 850 px * 550 px
2 – Radial gradient

3 - Fill the layer with gradient
Ajust - blur - gaussian blur 30
4 - Copy - paste as a new layer the landscape mist after removing the watermark
5 - Effects - Image effects - Seamless Tiling (default)
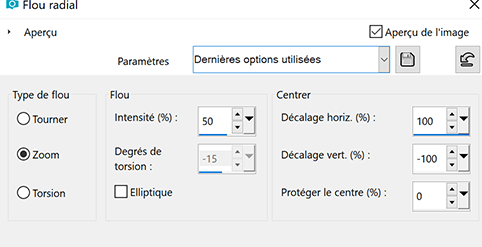
6 – Ajust – blur – radial blur
7 – Effects – Edge effects -Enhance - two times
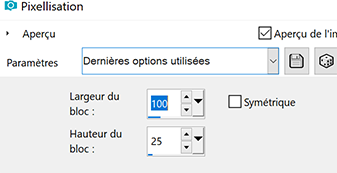
8 – Effects -Distortion Effects – Pixelate
9 – Activate the bottom layer raster 1 – Selections - Select all
Image - crop to the selection
10 – Layers - Merge visible layers
Layers duplicate
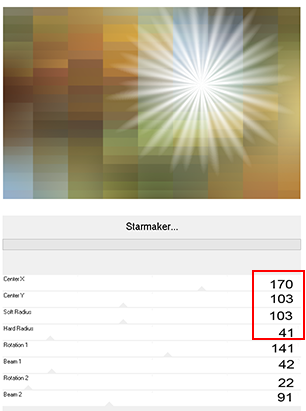
11 - Effects – Plugins Unlimited 2.0 – VM Natural – Starmaker
12 - Apply a second time with these settings
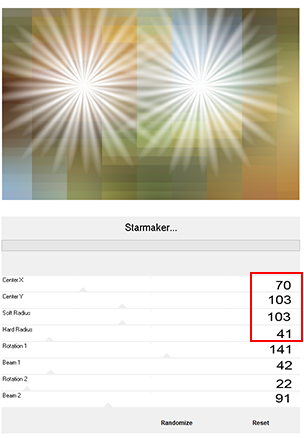
change blend mode to overlay
13 – Layers – new raster layer
Select all
Open the tube landscape
Edit copy
Paste in the selection
Selections – Select none
14 – Layers – New raster layer
Fill the layer with white color
Layers – New mask layer from image – select the mask Narah _mask1590

Effects – Edge effects -Enhance
Layers – merge – merge group
15 - Change blend mode to Luminance (legacy)
Layers – duplicate
Image – Mirror
Image – Flip
16 - Layers – merge – merge down
on this layer - erase slightly the mask on the tree

17 - Copy and paste the tube Deco Lines
Do not move it
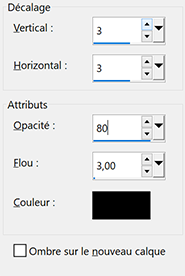
Effects – 3 D Effects - drop shadow
Change blend mode to overlay
Reduce the opacity to 85 %
19 - Layers - Merge visible layers
Edit -Copy
Image – Add borders
1 pixel - foreground color
15 pixels - white color
15 pixels - foreground color
21 - Select the white border with the magic wand
Select – invert
Effects – 3 D Effects drop shadow

Selections – Select none
23 - Image – Add borders
50 pixels - white color
24 - Select the white border with the magic wand
Edit - Paste into the selection the background in memory
Adjust - blur - gaussian blur 10
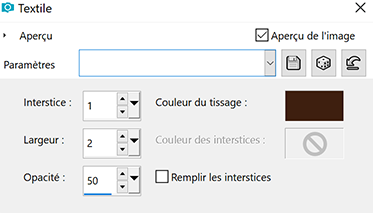
Effects - Texture Effects – weave - foreground color
select – invert
Effects – 3 D Effects drop shadow

Selections – Select none
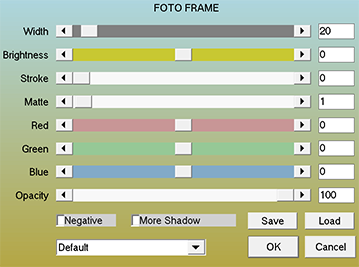
27 - Effets Plugins AAA Frames - Fotoframe
28 - Edit - Copy the woman tube as a new layer
Resize to 97 % - resize all layers not checked
Move to the right
Effects – 3 D Effects drop shadow

29 - Copy and paste the text tube after removing the watermark
Image - negative image (if you want)
Tool select (K) 86 et 457

30 - Effects – 3 D Effects drop shadow
Change blend mode to overlay
31 - Add your watermark
Image – Add borders
1 pixel - foreground color
Resize to 900 pixels
If you want, you can send me your version
If you have problems, or you find a not worked link, write to me

Une autre version avec un tube de Tine

-
Commentaires
|
|
|
|
un bien joli tuto en français comme en anglais
gros bisous ma belle amie
Coucou ma Lady
Merci pour ton gentil commentaire
Gros bisous copinette