-
Fantômes et citrouilles


Colybrix, thank you very much for your permission that I may translate your tutorials

Tutorial here
***

***
Plugins
Filters Unlimited > VM Natural
Mock
Graphic Plus
***
Colors
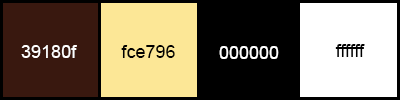
Foreground : #39180f
Background : #fce796
***
1 - Open the material on your Psp, duplicate and close the originals
Erase the watermarks if necessary, minimize
2 - File - New transparent 900 px / 550 px transparent
Fill with foreground color
Selections – Select all
3 - Activate "misted_automne4_tine_10.2021-190"
Tool Change to Target - size 300 px - go over the whole layer to change the color (or colorize as you wish)

Edit - Copy
Edit – Paste in the selection on your work
Selections - Select none
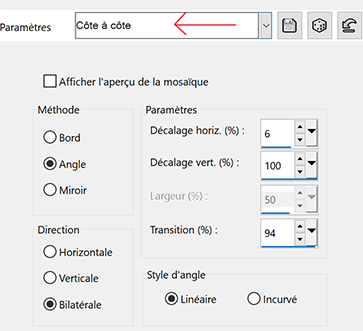
4 - Effects - Image effects - Seamless tiling - Side by Side
Adjust - Blur - Gaussian blur 30
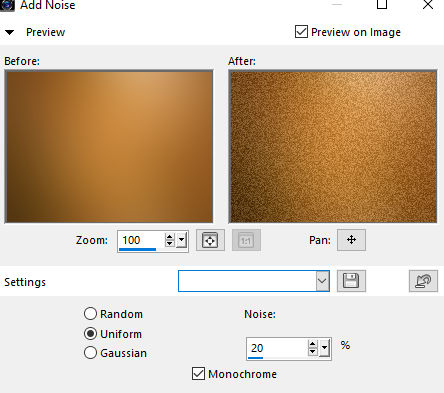
Adjust – Add/Remove Noise - Add Noise
5 - Edit – Paste as a new layer (landscape in memory)
Don't resize, Opacity 50
*Optional depending on your tube : Adjust - Brightness and Contrast
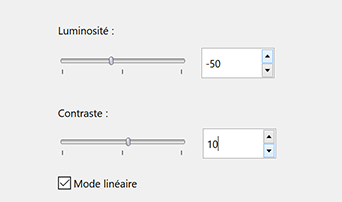
Activate Raster 1, do the same setting Brightness and Contrast
Result

6 - Activate the top layer (Raster 2)
Layers – New Raster layer
Fill with background color
Layers – New mask layer from image – select NarahsMasks_1671
Effects - Edges Effects - Enhance
Layers - Merge - Merge group
Blend Mode Overlay
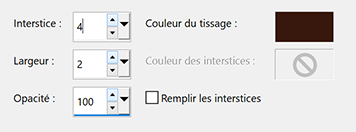
7 - Effects - Texture effects - Weave (foreground color)
8 - Edit – Copy "hallow26mist-coly"
Edit – Paste as a new layer
Image - Resize 75% resize all layers not checked
Pick tool (k) Position X 175, Position Y -69
9 - Layers – Arrange - Move down
Active the top layer
10 - Edit – Copy "Hallow39-coly"
Edit – Paste as a new layer
Image - Resize 50% resize all layers not checked
Tool Pick (k) Position X 3, Position Y 327
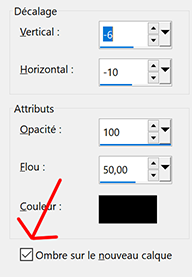
11 - Effects - 3D Effects - Drop shadow - Black color
Check: Shadow on a new layer
On the shadow layer
Effects - Texture effects - Weave (white color)

12 - Edit – Copy (casper2-hallow13)
Edit – Paste as a new layer
Image - Resize 35% resize all layers not checked
Pick Tool (k) Position X 23, Position Y 22
13 - Effects - 3D Effects - Drop shadow - Black color (same settings)
On the shadow layer
Effects - Texture effects - Weave (white color) same settings
14 - Activate top layer
Layers – New Raster layer
Fill with black color
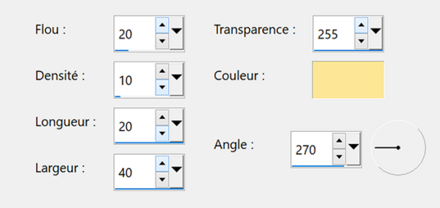
Effe ts - Illumination Effects - Sunburst
*if you are using another landscape than mine, try to place the small cross on the small window on the left at the height of the moon if there is one (cancel and start again if you are not satisfied with the placement of the cross - you can also lower the opacity of the black layer a bit, to see what is underneath to help you

Effects - Edge effects - Enhance
Blend mode Screen - opacity 60
15 - Activate the bottim layer (Raster 1)
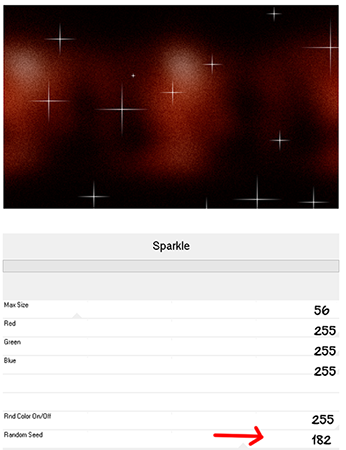
Effects Filters Unlimited - VM Natural - Sparkle
16 - Layers - Duplicate
Effects Mock - Windo by default
Opacity 50
17 - Activate the bottom layer
Edit – Copy
Layers - Merge all flatten
Selections - Select all
Effects - Effects 3D - Cutout

Selections - Select none
18 - Image – Add borders
1 pixel – black color
3 pixels – background color (#fce796)
1 pixel – black color
19 - Selections – Select all
Image – Add borders
50 pixels – black color
Selections – Invert
Edit – Paste into selection
20 - Effects - Texture effects - Straw wall
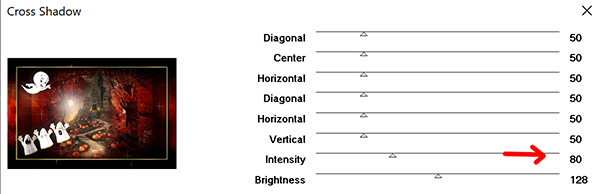
21 - Effects - Graphic Plus - Cross Shadow
by default except Intensity 80
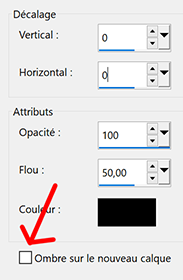
22 - Selections – Invert
Effects - 3D Effects - Drop shadow - Black color
Uncheck shadow on new layer
Edit – Repeat Drop shadow
Selections – Select none
23 - Effects - AAA Frames - Foto Frame

24 - Edit – Copy lthe tube (fetes_halloween13_tine)
Image - Resize 65% resize all layers not checked
Place on the right
Drop shadow of your choice
25 - Add your watermark
Image – Add borders
1 pixel – black color
26 - Image – Resize 950 pixels - resize all layers checked
Save Jpeg
If you want, you can send me your version
If you have problems, or you find a not worked link, write to me

Une autre version avec des tubes de Colybrix et Tine

Muito obrigada Joice
-
Commentaires
|
|
|
|