-
Irina


Colybrix, thank you very much for your permission that I may translate your tutorials

Tutoriel original ici
***

***
Plugins
FM Tile Tools
Eye Candy 5 : Impact > Glass
***
Colors

Foreground #520508
Background #e0cfb2
Color 3 #e3c757
Color 4 #ffffff
***
1 - File - New transparent 900 x 550 pixels transparent
Fill with this gradient
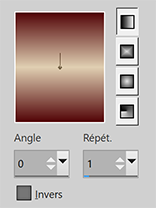
Adjust - Blur - Gaussian blur 40
2 - Layers – New raster layer
Selections – Select all
Open "LD-model-813" - Erase the watermark
Edit – Copy
Edit – Paste into selection
Selections – Select none
3 - Effects - Image effects -Seamless Tiling by default
Adjust - Blur - Gaussian blur 40
Blend mode Soft light (or other)
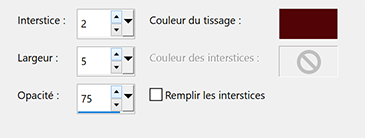
Effects - Texture Effects - Weave Foreground color

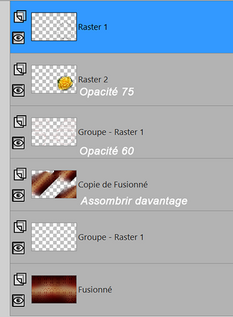
4 - Layers - Merge visible
Layers - Duplicate
Blend mode Multiply
Layers - Merge visible
5. Calques – Dupliquer
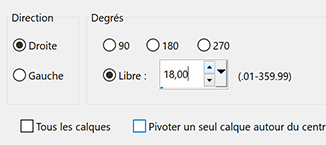
Effets Géométriques > Inclinaison

6 - Pick Tool (k) Position X -352, Position Y 0

Effects - Image effects -Seamless Tiling by default
Blend mode Darken

7 - Layers – New raster layer
Fill with white color
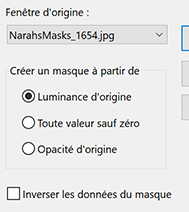
Layers – New mask layer from image – select NarahsMasks_1654
Effects - Edge effects - Enhance
Layers - Merge - Merge group
8 - Effects FM Tile Tools - Blend Emboss by default
Opacity 60
Effects - Texture Effects - Blinds - Color foreground

9 - Move to bottom layer (Merged)
Layers – New raster layer
Fill with white color
Layers – New mask layer from image – select NarahsMasks_1652

Layers - Merge - Merge group
10- Move to the top layer
Layers - New Raster layer
Selections – Load/Save selection - Load selection from disk - Selection cercle Irina
Effects Eye Candy 5 - Impact - Glass (color doesn't matter)

11 - Open "fleur 100-coly" - Erase the watermark
Edit - Copy
Edit - Paste as a new layer
Image – Resize 60% - resize all layers not checked
place in the center of the circle
Selections – Invert
Delete
Selections – Select none
Layers – Arrange - move down
Opacity 75 (or as you prefer)

12 - Open "LD-model-813"
Edit - Copy
Edit - Paste as a new layer
Don't resize
Move to the left –Pick Tool (k)

We will replace it more in the center then but for the mask which follows, leave to the left
13. - Layers – New mask layer from image – select Masque Irina – Coly
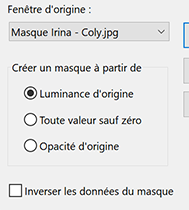
Layers - Merge - Merge group
Move to the center, for my tube Horizontal position 244, vertical position 11
Blend mode Overlay - Opacity 50

14 - Edit – Copy spécial - Copy merged
15 - Image – Add borders
1 pixel – color 1
3 pixels – color 3
1 pixel – color 1
16. -Selections – Select all
Image – Add borders
40 pixels – color 1
Selections – Invert
Edit – Paste into selection (background in memory)
Adjust – Blur - Gaussian blur 20
17 - Effects - Texture Effects - Weave Foreground color (same settings - in memory)
Selections – Invert
Effects 3D - Drop shadow: 0, 0, 100, 45 black color
18 - Selections – Select all
Selections – Modify - Contract 20 px
Effects 3D - Drop shadow: 0, 0, 100, 45 black color
19 - Selections – Modify - Select selection borders

Fill with color 3
Selections – Select none
20 - Edit – Copy "LD-model-813"
Edit - Paste as a new layer
Image – Mirror
Image – Resize 80% - resize all layers not checked
Move to the left
Adjust - Sharpness - Sharpen
21 - Layers - Duplicate
On the one below (original)
Adjust - Blur - Gaussian blur 20
Blend mode Multiply
Layers - Duplicate
22 - Tool text (or take the title provided)

Foreground color 1
Background color 3
Write Irina
Convert to Raster layer
Pick tool (k) Position X 664, Position Y 112
Image – Free rotate
23 - Effects 3D - Inner Bevel

Effects 3D - Drop shadow 6, 4, 80, 10, black color
24 - Add your watermark
Image – Add borders
1 pixel – color 1
Image – Resize 950 pixels - resize all layers checked
Save Jpeg
If you want, you can send me your version
If you have problems, or you find a not worked link, write to me

Une autre version avec des tubes de Tine

Autre version avec des tubes perso

Muito obrigada Roberta

-
Commentaires
|
|
|
|