-
Livia


Colybrix, thank you very much for your permission that I may translate your tutorials

Original tutorial here
***

***
Preparation
Open tile or43 - Edit define pattern

The tile will be the last in your active patterns
Do the same with the Horizontal Gold tile
I put in the material the same tiles in silver tones if the colors of the gold tiles do not match your colors, in this case import the silver tiles
***
Dark color 170c0e
Light color efd6b4
Color 3 (title text): eaca1f

1 - Open the Alpha Livia layer (it contains selections)
Image - Duplicate, we work on the copy
2 - Fill the layer with the dark color
Open image Coly - mask38 - select all - copy
3 - On your work
New layer, fill with light color
Add a layer mask

Important : while holding down the Alt key, click on the white thumbnail of the layer mask in the layer window

The layer is white
4 - Ctrl V (paste) - your mask will paste into the layer mask

5 - Right click on the layer mask thumbnail
Apply the layer mask

6 - Deselect
7- Filter – Sharpen – Unsharp Mask

8 - Layer duplicate
Set the opacity of this layer to 50%
Layer Merge visible
9 - Image -Adjustements - brightness / contrast
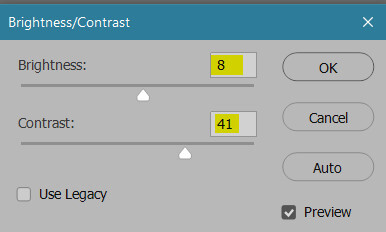
Result

10. Select - Load selection
Choose selection 1 in the scroll menu

11. Ctrl J (layer via copy)
Layer style
Pattern overlay - choose the 43 gold tile (or 223 silver according to your colors)

Drop shadow

12 - Go to the layer below (layer 2 copy)
Layer Style - Pattern Overlay - Choose Horizontal Gold Pattern

13 - Stay on the layer below (layer 2 copy)
Select - load the selection
Choose selection 2 in the scroll menu
14 - Image - Adjustements – brightness / contrast

Deselect
15 - Return to the top layer (layer 1)
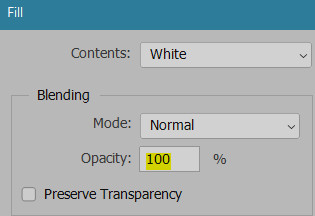
New layer
Edit - Fill with white color
16 - Open the Coly-mask-14 mask
Select all - copy
17. Go back to your work, we do the same steps as for the previous mask
- Add a layer mask on the white layer
While holding down the Alt key, click on the white thumbnail of the layer mask in the layer window
Ctrl v ( edit - paste)
Right click on the layer mask thumbnail
Apply the layer mask
18 - Deselect
Set the opacity of this layer to 75% and change blend mode - Overlay
19 - Open the landscape mist 104
Using the lasso tool or Rectangular Marquee Tool at 0 - erase the watermark
Copy - paste on your work
Ctrl T (free transform)
Link checked put its settings (X - Y - L - H)

20 - Blend mode linear light mode (or other)
Move this layer under layer 2

21 - Merge visible layers (Do not flatten)
22. Image - canvas size (120 and 110)

23 - Open frame 18
Using Rectangular Marquee Tool, progressiveness to 0
Erase watermark in the center
24 - Select all - copy
Paste to your work - normally it is the right size
(To change the frame color on my 2nd version I made image-adjustments- Hue and saturation (ctrl u) with my dark color in the foreground
check colorize or redefine depending on the version,
move the saturation and brightness sliders to accentuate, darken or lighten if you wish)25 - Open Woman 761 Coly - remove the watermark
Copy - paste on your work
Ctrl T (free transform) with these settings

26 - Layer style - drop shadow

27 - Open the Title Livia tube
Copy - paste on your work
Move to top left
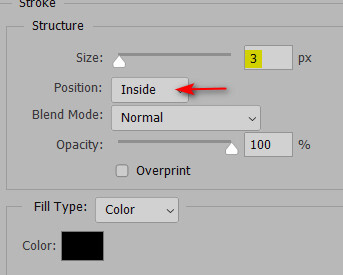
28 - Layer style
Color (I took a yellow color on the work : eaca1f)

Stroke (dark color)
Bevel and emboss (Inner bevel)

Drop shadow

29 - Open flower 76 Coly - remove the watermark
Copy - paste
Ctrl T free transform)

30 - Layer style - Drop shadow

31 - Add your watermark
Merge flatten all
32 - Image - Canvas size
2 pixels in Width and Height dark color
33 - Image - image size 900 pixels
If you want, you can send me your version
If you have problems, or you find a not worked link, write to me

Une autre version avec des tubes de Colybrix, Guismo et Tine

Thank you Win

-
Commentaires
|
|
|
|