-
Parfum de fleurs


Colybrix, thank you very much for your permission that I may translate your tutorials

Tutoriel original ici
***

***
Plugins
Carolaine and Sensibility
Mura’s Meister
Graphic Plus
***
Colors
Foreground #6a9628
Background #e6e68c

***
1 - Open tubes and masks on PSP
Open Alpha layer – Window / duplicate (Ctrl D)
We work on the copy
2 - Fill with dark color
3 - Layers - New raster
Selections - Select all
Open "Femme 645 et fleurs" – Erase the watermarck
Edit - Copy
Edit - Paste into selection
Selections - Select none
4 - Effects - Image effects - Seamless tiling by default
5 - Adjust - Blur - Radial blur

6 - Effects - Edge effects - Enhance
Edit - Repeat Enhance Edges
Blend mode Luminance (Legacy)
Opacity 57
Layers - Merge - Merge down
7 - Adjust - Blur - Gaussian blur 10
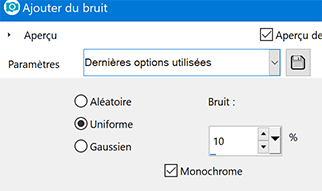
8 - Adjust - Add/Remove noise / Add noise
9 - Layers - New raster
Fill with the light color
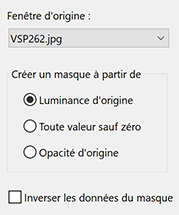
Layers - New mask layer from image
Select VSP 262
10 - Layers - Duplicate
Layers - Merge - Merge group
Layers - Duplicate
Image – Mirror (horizontal)
11 -Layers - Merge - Merge down
Effects - Edges effects - Enhance
12 - Selections - Load/Save selection - Load selection 1 from Alpha Channel
Effects - Texture effects - Weave

13 - Effects - 3D Effects - Inner Bevel

14 - Selections - Select none
15 - Selections - Load/Save selection - Load selection 2 from Alpha Channel
Effects - Carolaine and Sensibility – CS- DLines by default
16 - Effects - 3D Effects - Inner Bevel – same settings
Selections - Select none
17 - Activate layer bottom (Raster 1)
Selections - Load/Save selection - Load selection 3 from Alpha Channel
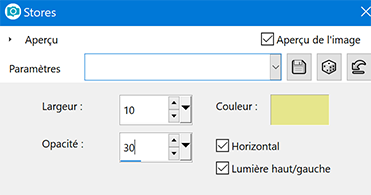
Effects - Texture effects - Blinds
18 - Selections - Promote selection to layer
Selections - Select none
Blend mode Soft Light (or other)
Layers - Merge down
19 - Effects - Image effects - Seamless tiling by default
20 - Open "Fleur70mist-coly" – Erase the watermark
Edit - Copy
Edit - Paste as a new layer
Image - Resize 125% - resize all layers not checked
21 - Effects - Image effects - Seamless tiling by default
Opacity 55
22 - Activate the top layer
Edit - Paste as a new layer the mist flower in memory
Image - Resize 50 % - resize all layers not checked
Adapt the percentage to your tube so that it is roughly the size of the space between the two lines of the mask
23 - Effects - Mura’s Meister – Copies

24 - Tool select (K)
Layers - Arrange - Move down
25 - Activate the top layer
Layers - New layer raster
Fill with white color
Layers - New mask layer from image
Select VSP253

26 - Effects - Edges effects - Enhance
Layers - Merge - Merge group
27 - Selections - Load/Save selection - Load selection 1 from Alpha Channel
Press the delete key on the keyboard
Selections - Select none
28 - Blend mode Luminance (Legacy)
29 - Text Tool (T) – Police Kristen ITC with the settings or use the text in the material

Write letter "P" Size 100
Size 60 and write "arfum"
Layers - Convert to raster layer
30 - The text written, I made a rectangle selection around "de fleurs"
Edit - Cut
Selections - Select none - paste as new layer
And replace closer and slightly shifted to the right (the D under the A)
Layers - Merge - Merge down
31 - Image - Resize 95% - resize all layers not checked
Tool select (K)

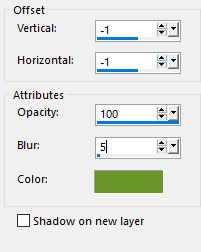
32 - Effects - 3D Effects - Drop shadow – Foregroung color

And in negative
33 - Result


34 - Layers - Merge - Merge visible
Edit - Copy
paste as a new image (as a precaution not necessary if you use the frame provided)
If you do not want to make the frame, it is in the material
In this case after merging the layers
Image – Canvas size

Open "cadre parfum Coly" - Erase the watermark
Edit - Copy paste as a new layer
Go to step 46
35 - Image – Add borders
1 pixel – dark color
3 pixels – light color
1 pixel – dark color
5 pixels – white color
1 pixel – dark color
10 pixels – white color
36 - Selections - Select all
Image – Add borders
10 pixels – dark color
Selections - Invert
Effects Graphic plus – Cross Shadow by default
37 - Selections - Select all
Selections – Modify – Contract 20 pixels
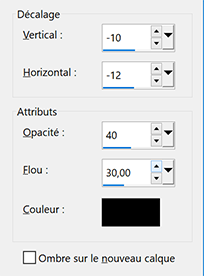
Effects - Effects 3D - Drop shadow dark color

38- Selections - Select none
39 - Image – Add borders
1 pixel – dark color
10 pixels – white color
1 pixel – dark color
25 pixels – white color
40 - With the Magic Wand, select the last border (25 px white color)
Edit - Paste the background into selection
41 - Adjust - Blur - Gaussian blur 10
42 - Effects - Texture effects - Blinds - same settings in memory
43 - Effects Graphic plus – Cross Shadow
By default except Intensity 50
44 - Selections - Invert
Effects - 3D effects - Drop shadow

45 - Selections - Select none
46 - Continue here if you used the frame provided
Open "Femme 645 et fleurs" – Erase the watermarck
Edit - Copy
Edit - Paste as a new layer
Image - Resize 90% - resize all layers not checked
Image - Mirror (Horizontal)
Move on the left
Effects - 3D effects - Drop shadow
47 - Open "Fleur70mist-coly"
Edit - Copy
Edit - Paste as a new layer
Image - Resize 60% - resize all layers not checked
48 - Tool select (K)

49 - Add your watermark
50 - Image – Add borders
1 pixel – dark color
Resize 900 pixels
File - Save as JPG
If you want, you can send me your version
If you have problems, or you find a not worked link, write to me

Une autre version avec un tube femme de Karine Dreams

-
Commentaires
|
|
|
|