-
Par jewelAnnie le 21 Février 2023 à 16:00


Colybrix, thank you very much for your permission that I may translate your tutorials

Tutorial here
***

***
You can find images for the background and mister in the folder, below

And mist on my blog => Here
***
Plugins
Simple
Carolaine and Sensibility
L en K
Alien Skin Eye Candy 5 - Impact
***
Colors
Foreground : #a34aa7
Background : #f5bed2
Color 3 : #ffffff

***
1 - Open Alpha Love nature fantasy – Window / duplicate (Ctrl D)
We work on the copy
Selections – Select all
Copy and paste "image fond" into the selection
Selections - none
2 - Adjust - Blur - Gaussian blur 30
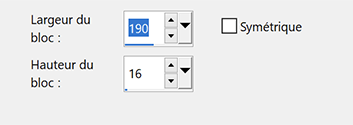
Effects - distorsion effects - Pixelate(190, 16)
Effects Simple - Blintz
Effects Simple - Diamonds
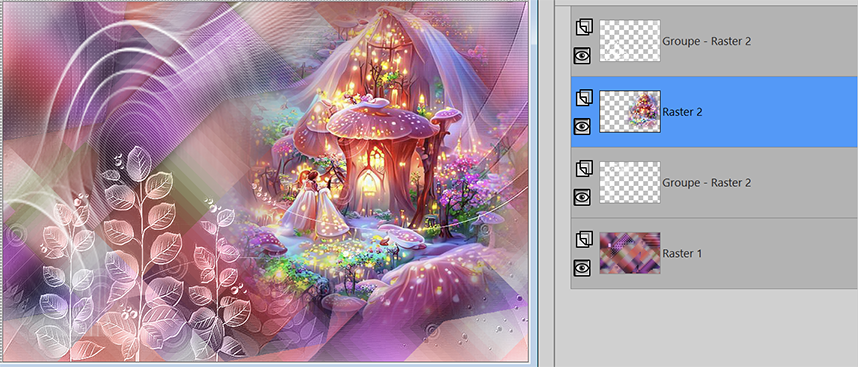
3 - Layers - Duplicate
Adjust - Blur - Gaussian blur 30
Blend mode - Overlay - opacity 50
Layers - Merge - Merge down
4 - Selections – Load / Save selection - Load Selection 1 from Alpha Channel
Adjust - Blur - Gaussian blur 10
Effects Carolaine et Sensibility - CS-LDots

Repeat a 2nd time
Effects 3D - Drop shadow 0, 0, 50, 30, black
5 - Selections – Load / Save selection - Load Selection 2 from Alpha Channel
Effects Carolaine et Sensibility - CS-Hlines

Repeat a 2nd time
Effects 3D - Drop shadow 0, 0, 50, 30, black
6 - Selections – Load / Save selection - Load Selection 3 from Alpha Channel
Adjust - Blur - Gaussian blur 10
Effects Carolaine et Sensibility > CS – Dlines

Adjust - Sharpness - Sharpen
Effects 3D - Drop shadow 0, 0, 50, 30, black
7 - Selections – Load / Save selection - Load Selection 4 from Alpha Channel
Adjust - Blur - Gaussian blur 10
Effects L&K Paris by default – Repeat a 2nd time

Adjust - Sharpness - Sharpen
Effects 3D - Drop shadow 0, 0, 50, 30, black
8 - Selections – Select - None
9 - Layers – New Raster layer
Fill with white color
Layers – New mask layer from image – select NarahsMasks_1769
Layers - Merge - Merge group
Image – Mirror horizontal
Pick tool (k) Position X : -114, Position Y. : -42
10 - Layers – New Raster layer
Fill with white color
Layers – New mask layer from image – select masque Tine 128
Effects - Edge effects - Enhance
Layers - Merge - Merge group
11 - Layers - Duplicate
Layer - merge down
Blend Mode Luminance (Legacy)
12 - Open "maison fantasy16-coly"
Erase the watermark
Edit - Copy
Edit - Paste as a new layer
Place on the right
Layers - Arrange - Move down
13 - Move to the top of the layer
Open "papillons blancs"
Edit - Copy
Edit - Paste as a new layer
Image – Resize 50% all layers not checked
Pick tool (k) Position X : -8, Position Y. : 29
14 - Edit - Copy special - Copy merged
Edit - Paste as a new layer
Effects - geométric effects - Circle, transparent
15 - Image – Resize 10%, all layers not checked
Effets Alien Skin Eye Candy 5 Impact - Glass
Settings - Clear
16 - Pick tool (k) Position horiz : 25, Position vert. : 168
Layers - Duplicate
Outil Sélectionner (k) Position X : 76, Position Y : 46
Layers - Duplicate
Outil Sélectionner (k) Position X : 211, Position Y : 2
Layers - Merge down X2
17 - Open "papillon couleurs"
Edit - Copy
Edit - Paste as a new layer
Place where you want
Effects 3D - Drop shadow -5, -5, 30, 10, black
18 - Open "Titre Love Nature"
Edit - Copy
Edit - Paste as a new layer
Image – Negative image
Image – Resize 75%, all layers not checked
Place at the bottom right
Layes - Duplicate
Layers - Merge - Merge down
Effects 3D - Drop shadow - Foreground color

19 - Move to the bottom layer
Copy
20 - Image – Add borders
1 pixel – foreground color
3 pixels – background color
1 pixel – foreground color
21 - Selections – Select all
Image – Add borders
30 pixels –white color
Effects 3D - Drop shadow - Foreground color

22 - Selections – Invert
Effects Carolaine and Sensibility - CS – Dlines
Adjust - Sharpness - Sharpen
Select none
23 - Image – Add borders
1 pixel – foreground color
Selections – Select all
Image – Add borders
10 pixels – white color
Selections – Invert
24 - Edit – paste into selection, (the background in memory)
Adjust - Blur - Gaussian blur 5
Selections - Promote selection to layer
Blend mode Multiply
Layers - Merge - merge down
Selections - None
25 - Add your watermark
Layers - Merge all
Resize 950 pixels
Save Jpeg
If you want, you can send me your version
If you have problems, or you find a not worked link, write to me

Une autre version avec un tube dragon de Colybrix

Merci Narah

 votre commentaire
-
Par jewelAnnie le 22 Janvier 2023 à 16:00


Colybrix, thank you very much for your permission that I may translate your tutorials
Tutorial here
***
***
Plugins
Compatibles pour version Psp en 64 bits
Flaming Pear : Circle to Square
Se trouve dans le dossier Flaming Pear Freebies if you don't have it
Flaming Pear : Flood 2 (ou Flood)
***
Colors
Foreground : #5f2d20
Background : #fcf0d0

***
1 - Open Alpha Claudia – Window / duplicate (Ctrl D)
We work on the copy
Fill with linear gradient

Adjust - Gaussian blur 30
2 - Layers - New Raster Layer – Select all
Open "paysage Coly" Erase the watermark
Edit - Copy
Edit - Paste into selection
Selections – Select none
Layers - Duplicate
Close this layer and move to the layer below
3 - Adjust - Gaussian blur 30
Effects - Image effects - Seamless tiling - Side by Side

Layers - Merge - Merge down
4 - Adjust – Add/Remove Noise - Add Noise

5 - Layers - Duplicate
Image – Mirror horizontal
Blend mode Multiply (or other according to your colors)
* On my version 2, darker landscape colors, blend mode Overlay
Layers - Merge - Merge down
6 - Layers - New Raster Layer
Fill with light color
Layers – New mask layer from image – select "Coly-mask39"
Adjust - Sharpness - Sharpen
Layers - Merge - Merge group
Effects 3D - Drop shadow 10, 10, 100, 5, dark color
7 - Layers - Merge down
Effe ts Flaming Pear - Circle to Square
Layers - Duplicate
Blend mode Overlay - opacity 50
Layers - Merge down
8 - Selections – Load / Save selection - Load Selection 1 from Alpha Channel
Selections - Promote selection to layer
Adjust - Gaussian blur 30
Effects - texture effects - Weave
Light color

9 - Selections – Modify - select selection borders

Zoom in for a good look, fill with dark color, 2 times
Selections - select none
10 - Effects 3D - Drop shadow 10, 10, 100, 5, dark color
Blend mode Darken
11 - Open Copy of Raster 2
Layers - Duplicate
On Copy (2) of Raster 2 (the top layer)
Selections – Load / Save selection - Load Selection 1 from Alpha Channel
Selections – Invert
Erase
Selections - Select none
12 - Move to Copy of Raster 2
Layers – Arrange - Move down

* On my version 2 I lowered the opacity of Raster 2 Copy to 60% so that you can see the empty spaces of the layer above
13 - Move to the top layer
Duplicate
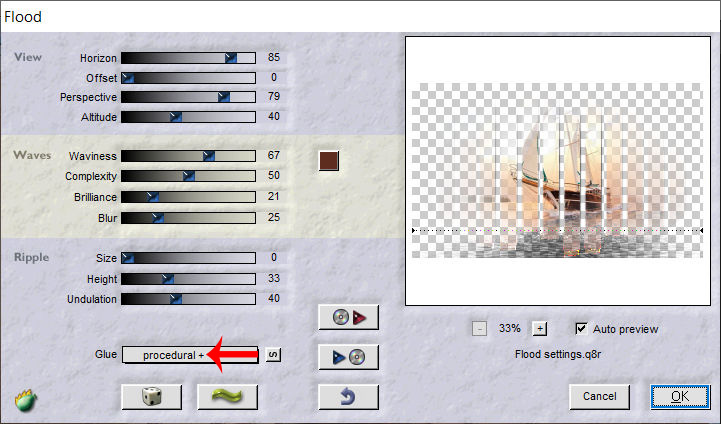
Effects Flaming Pear - Flood 2 (or Flood)
in the Glue Menu : put Procedural +
Flood 2

Or Flood
14 - Move to Promoted Selection
Effects Flaming Pear > Flood 2 (or Flood)
Same settings in memory except Horizon at 90
Flood 2
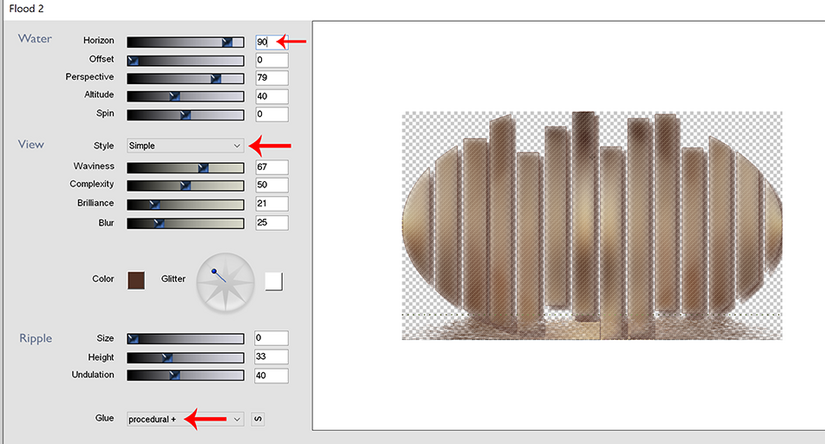
or Flood

Results according to the filter used

15 - Move to the bottom layer (Raster 1)
Layers - Duplicate
Layers - Arrange - Bring to top
Effects - Geometric Effects - Circle : Transparent
Effects 3D - Inner Bevel

16 - Image – Resize 12% all layers not checked
Pick Tool (k) : Position X 15, Position Y 15.
Effects 3D - Drop shadow 5, 5, 100, 5, dark color
17 - Layers - Duplicate
Pick Tool (k) : Position X 30, Position Y 30.
Layers - Merge - Merge down
18 - Layers - Duplicate
Image – Mirror horizontal
Layers - Merge - Merge down
19 - Layers – New Raster layer
Selections – Load / Save selection - Load Selection 2 from Alpha Channel
Fill with white color
Selection none
20 - Layers - Duplicate
Image – Mirror horizontal
Image – Mirror vertical
Opacity 75%
Layers - Merge - Merge down
Blend mode Luminance (Legacy)
Move to bottom layer (Raster 1)
Edit – Copy
21 - Image – Add borders
1 pixel – dark color
3 pixels - light color
1 pixel – dark color
22 - Selections – Select all
Image – Ajdd borders
35 pixels – dark color
Selections – Invert
Edit – Paste into selection
23 - Adjust - Gaussian blur in memory
Adjust - Add noise - settings in memory
Effects – Texture - weave in memory
24 - Selections - Promote selection to layer
Blend mode Multiply
Layers - merge down
25 - Selections – Invert
Effects 3D - drop shadow : black

26 - Selections – Select all
Selections – Modify - Contract : 8
Effects 3D - drop shadow in memory
Select none
27 - Open "femme850-coly" Erase the watermark
Edit - Copy
Edit - Paste as a new layer
Image – Resize 72%, all layers not checked
Move to the right
I did Adjust - One step Photo fix to lighten the tube
Drop shadow of your choice
Or Layers - Duplicate
Gaussian blur in memory on the one below
Blend mode Multiply
28 - Copy and paste as a new layer "Titre blanc"
Pick tool (k) Position X : 43, Position Y : 382
Or use the color title if you wish and go directly to the end (step 33)
29 - Select all
Selections - Float
Selections - Defloat
Fill with light color (Matching paint can on None)
30 - Effects - Texture effects - Weave, in memory but change the color of the weave to the dark color

31 - Effects 3D - Inner Bevel

Selections – Select none
32 - Effects 3D - Drop shadow Dark color

Do in negative -2, -2, 100, 2
33 - Add your watermark
Image – Add borders
1 pixel – Dark color
34 - Save Jpeg
If you want, you can send me your version
If you have problems, or you find a not worked link, write to me
une autre version avec un tube femme de Tine

Thank you so much Kika
 votre commentaire
-
Par jewelAnnie le 11 Janvier 2023 à 08:00


Colybrix, thank you very much for your permission that I may translate your tutorials
Tutorial here
***
***
Colors
Foreground : #4a54a2
Background : #ffffff

***
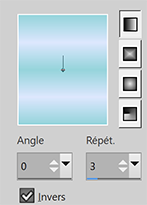
1 - File - New 875 x 525 pixels transparent
linear gradient

2 - Fill with the linear gradient
Adjust - Blur - Gaussian blur 25
Layers - Duplicate
Effects - Distorsion effects - pixelate (186/88)

3 - Effects - Image effects - Seamless Tiling
4 _ Blend mode Multiply
Layers - Merge down
5 - Selection Tool (S) – Custom Selection

Effects 3D - Drop shadow 0, 0, 75, 25, black
Selections none
6 - Edit - Copy "Pinceau point blanc"
Edit - Paste as a new layer
Pick Tool (k) Position X: 0, Position Y 0
7 - Effects - Distorsion effects - Spiky Halo

Layers - Duplicate
Image – Mirror Horizontal
Layers - merge -Merge down
Opacity 80 ( according to your colors)
8 - Layers - New raster layer
Fill with white color
Layers – New mask layer from image – creation.tine_masque 088
Layers - Merge - Merge group
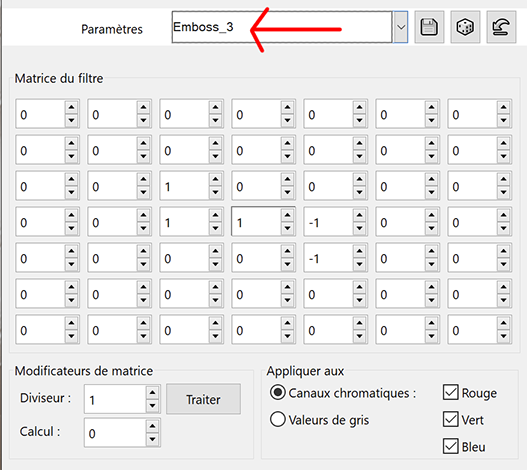
9 - Effects – User Defined Filter / Emboss 3
Effects 3D - Drop shadow 2, 10, 50, 15, black
Blend Mode Soft Light
10 - Open "paysghiver17-coly" Erase the watermark
Edit - Copy
Edit - Paste as a new layer
Image – Mirror horizontal
Image – Resize 80%, all layers not checked
11 - Layers - Duplicate
Effects - Image effects - Seamless Tiling - Same settings in memory
Adjust - Radial Blur

Layers - Rearrange downwards 3 times
Blend mode Overlay

12 - Move to the top layer (landscape)
Pick Tool (k) : Position X 228, Position Y 5
Result

13 - Open"deco"
Edit - Copy
Edit - Paste as a new layer
Don't move
Effects 3D - Drop shadow 2, 10, 50, 15, black
14 - Image - Add borders
1 pixel – dark color
15 - Selections – Select all
Image – Add borders
20 pixels – white
Effects 3D - Drop shadow : 0, 0, 75, 25, black
Select none
16 - Selection Tool (S) – Custom Selection

Selections - Invert
Edit – Copy
17 - Selections – Select all
Image – Add borders
25 pixels – white
Selections – Invert
Edit –Paste into selection
Select none
18 - Open "PelucheHiver1-coly"
Edit - Copy
Edit - Paste as a newl layer
Image - Resize 55% all layers not checked
Move to the left
Effects 3D - Drop shadow -23, 22, 30, 25 couleur noire
19 - Move to the background
Effects - Illumination Effects - Sunburst with these settings

If you wish, you can change the horizontal and vertical settings, so that the center of the effect is slightly behind the tube, thus not too visible
20 - Add your watermark
Image – Add borders
1 pixel – dark color
Image – Resize 950 pixels
Save Jpeg
If you want, you can send me your version
If you have problems, or you find a not worked link, write to me
une autre version avec un tube Puppy de Tine
Thank you so much Narah

Thank you so much Kika

 votre commentaire
-
Par jewelAnnie le 13 Décembre 2022 à 16:00


Colybrix, thank you very much for your permission that I may translate your tutorials
Tutorial here
***
***
Plugins
It@lian Editors Effect
Graphic Plus
***
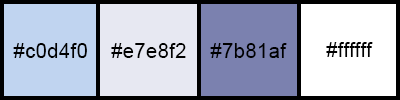
Colors
Color 1, foreground : #c0d4f0
Color 2, background : #e7e8f2
Color 3 : #7b81af
Color 4 : #ffffff
***
1 - File - New 875 x 525 pixels transparent
Fill with linear gradient colors 1 et 2

2 - Open "paysghiver16-coly" - Erase the watermark
Edit - Copy
Edit - Paste as a new layer
Image – Mirror horizontal
Image - Resize 83% all layers not checked
Layers - Duplicate
Close the copy layer
3 - On the layer below (the mis)
Effests - Image effects - Seamless Tiling (Side by Side)
Adjust - Blur - Gaussian blur 10
Layers - Merge down
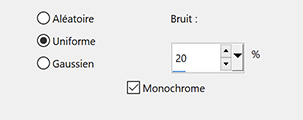
4 - Adjust - Add/Remove Noise - Add Noise

Layers - Duplicate
5 - Effects - Geometric effects - Skew
6 - Effects - It@lian Editors Effect - Effetto Fantasma, by default
Effects - Edge effects - Enhance
Effects 3D - Drop shadow 8, 8, 70, 15, color 3

Effects 3D - Drop shadow -8, -8, 70, 15, color 3
7 - Open top layer and activate
Pick tool (k) - Position X 219 - Position Y 0
8 - Color background - White
Layers - New raster layer
Fill with white color
Layers – New mask layer from image – select NarahsMasks_1752

Effects - Edge effects - Enhance
Layers - Merge - Merge group
9 - Layers - New raster layer
Fill with white color
Layers – New mask layer from image – select NarahsMasks_1754
Effects - Edge effects - Enhance
Layers - Merge - Merge group
10 - Image – Resize - as on the picture

Pick Tool (K) Position X -9, position Y -92.
11 - Eraser tool with these settings

Lightly erase on the bottom edge (4-5 passes on each side)
Before

After
12 - Edit - Copy "sol neige droite"
Edit - Paste as a new layer
Objects - Align right
Objects - Align bottom
Edit - Copy "sol neige gauche"
Edit - Paste as a new layer
Objects - Align left
Objects - Align bottom
Blend mode Luminance (Legacy) forthese two tubes
13 - Image – Add borders
1 pixel – color 3
5 pixels – color 4
14 - Select - Select all
Image – Add borders
5 pixels – color 3
Selections – Invert
Effects Graphic Plus - Cross Shadow

15 - Select - Select all
Image – Add borders
20 pixels – color 4
Effects 3D - Drop shadow 0, 0, 50, 15, black
16 - Select - Select all
Image – Add borders
5 pixels – color 3
Selections – Invert
Effects Graphic Plus - Cross Shadow - same settings
17 - Select - Select all
Image – Add borders
30 pixels – color 4
Effects 3D - Drop shadow : 0, 0, 50, 15, black
Selections – Select none
18 - Open "flocons bordure"
Edit - Copy
Edit - Paste as a new layer
Don't move
19 - Open "dessin77-anim55-coly" Erase the watermark
Edit - Copy
Edit - Paste as a new layer
Mirror - Mirror horizontal
Image – Resize 70%, one layer only, don't forget to check the Lock proportions box
Move to the left
Effects 3D - Drop shadow : -5, -5, 50, 15, black
20 - Open "ours"
Edit - Copy
Edit - Paste as a new layer
Image – Resize 50%, all layers not checked
Make a rectangle selection like this
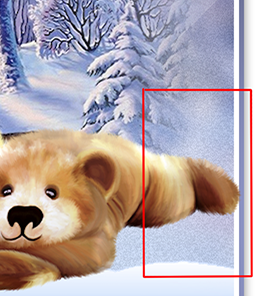
Delate
Place against the bottom right border
Effects 3D - Drop shadow -5, -5, 50, 25, black
21 - Open "WA - Douceur hivernale-creaColy"
Erase the watermark
Image – Resize 70%, all layers not checked
Move to the top right
Effects 3D - Drop shadow: 2, 2, 50, 2, black
22 - Add your watermark
Image – Add borders
1 pixel – color 3
Image – Resize 950 pixels
Save Jpeg
If you want, you can send me your version
If you have problems, or you find a not worked link, write to me
Une autre version avec des tubes de Tine et Colybrix

Thank you so much Kika

Thank you so much Etelka
 votre commentaire
-
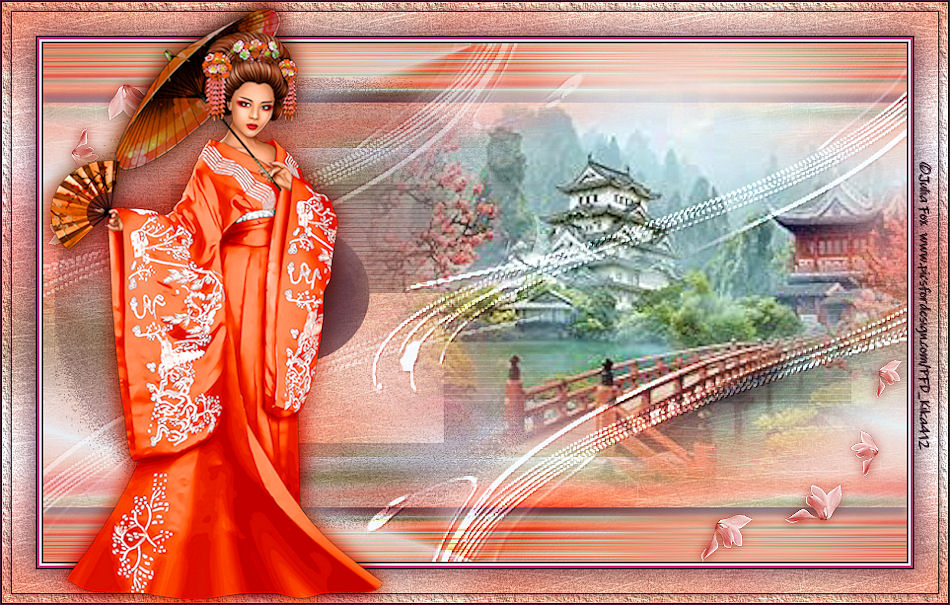
Par jewelAnnie le 6 Novembre 2022 à 16:00


Colybrix, thank you very much for your permission that I may translate your tutorials
Tutorial here
***
***
Plugins
Flaming Pear : Sphere Warp A
The effect used can be found in the Freebies filter folder of Flaming Pear if you have not yet installed it.
Filters Unlimited 2.0 > Paper textures > papier kasy 1
AAA Frames
***
Colors
Color 1 : #dbe7ff
Color 2 : #7fd6dd
Color 3 : #1a1b3a
Color 4 : #d46198
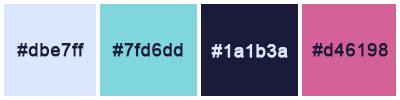
***
1 - File - New 875 x 525 pixels transparent
Fill with linear gradient colors 1 et 2
Adjust - Blur - Gaussian blur 15
2 - Layers - New raster layer
Selections – Select all
Open "femmasie10-coly" Erase the watermark
Edit - Copy
Edit - Paste into selection
Selections – Select none
Effects - Image effects - Seamless Tiling by default
Adjust - Blur - Gaussian blur 35
Adjust - Add/Remove Noise - Add Noise
Layers - Merge - Merge down
3 - Effects Flaming Pear - Sphere Warp A
4 - Selection Tool (S)
Custom selection

Effects Filters Unlimited 2.0 - Paper textures - papier kasy 1 by default

Effects 3D - Drop shadow 8, 0, 75, 10, color 3
Effects 3D - Drop shadow - 8, 0, 75, 10, color 3
Selections – Selection none
5 - Layers - New raster layer
Fill with color 1
Layers – New mask layer from image – select "Coly-mask38"

Effects - Edge effects - Enhance
Layers - Merge - Merge group
6 - Layers - New raster layer
Fill with color 3
Layers – New mask layer from image – select "NarahsMasks_1729"

Adjust - Sharpness - Sharpen
Layers - Merge - Merge group
Effects 3D - Drop shadow 0, 0, 75, 1, couleur 3
7 - Open "Krysmistpaysage-21-06-2017-003" - Erase the watermark
Edit – Copy
Edit – Paste as a new layer
Image – Miroir horizontal
Move it to the right
8 - Layers - New raster layer
Fill with color 1
Layers – New mask layer from image – select "Coly-mask-13"
Effects - Edge effects - Enhance
Layers - Merge - Merge group
9 - Pick Tool (k) – Position X - 235.
Effects 3D - Drop shadow 1, 1, 75, 1, color 3
Blend mode Overlay
10 - Layers - Duplicate
Image – Mirror horizontal
Image – Mirror vertical(Flip)
Opacity 50%
11 - Open "déco fleurs"
Edit – Copy
Edit – Paste as a new layer
Pick Tool (K) – Position X 5, Position Y 0
Layers - Duplicate
Image – Mirror horizontal
Image – Mirror vertical(Flip)
Layers - Merge - Merge down
12 - Layers - Duplicate
on the layer below - Adjust - Blur - Gaussian blur 5
Blend mode Multiply
13 - Edit – Copy special - Copy merged
14 - Image – Add borders
2 pixels – color 3
2 pixels – color 1
2 pixels – color 4
2 pixels – color 3
15 - Selections – Select all
Image – Add borders
35 pixels – color 3
Selections – Invert
16 - Edit – Paste into selection
Adjust - Blur - Gaussian blur 15
Adjust - Add/Remove Noise - Add Noise - same settings in memory
Effects Filters Unlimited 2.0 > Paper textures > papier kasy 1, by default
Selections – Invert
Effects 3D - Drop shadow 0, 0, 75, 35, couleur 3
Selections – Select none
17 - Effets AAA Frames > Texture Frame

Selections – Select all
Selections – Modify > contract : 10
Effects 3D - Drop shadow 0, 0, 75, 10, couleur 3
Selections – Select none
18 - Open "femmasie10-coly" Erase the watermark
Edit - Copy
Edit - paste as a new layer
Image - Resize 85 % all layers not checked
Move it on the left
Layers - Duplicate
on the layer below - Adjust - Blur - Gaussian blur 10
Blend mode Multiply
19 Add your watermark
Image – Add borders
1 pixel – color 3
Image - Resize 950 pixels
Save Jpeg
If you want, you can send me your version
If you have problems, or you find a not worked link, write to me
Une autre version avec un tube femme de Thafs

Thank you so much Kika
 votre commentaire
 Suivre le flux RSS des articles de cette rubrique Suivre le flux RSS des commentaires de cette rubrique


|
|
|
|