-
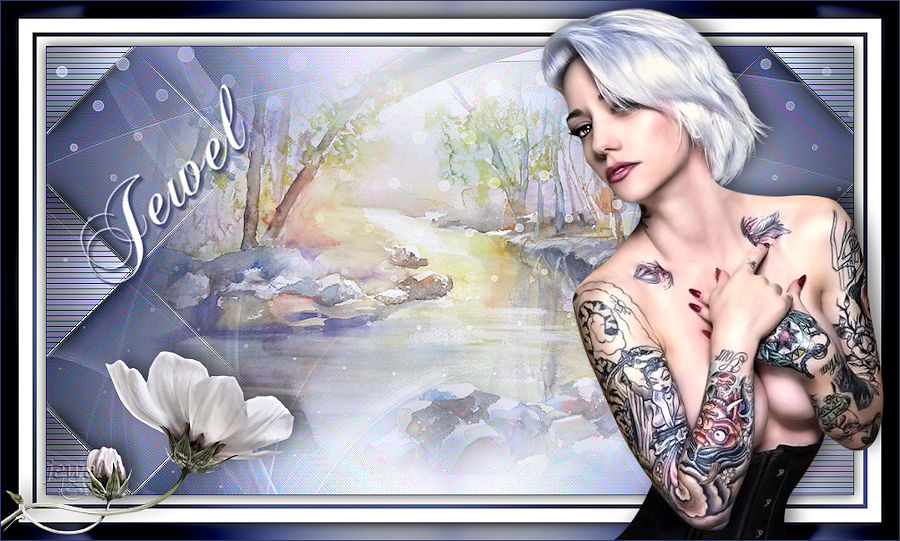
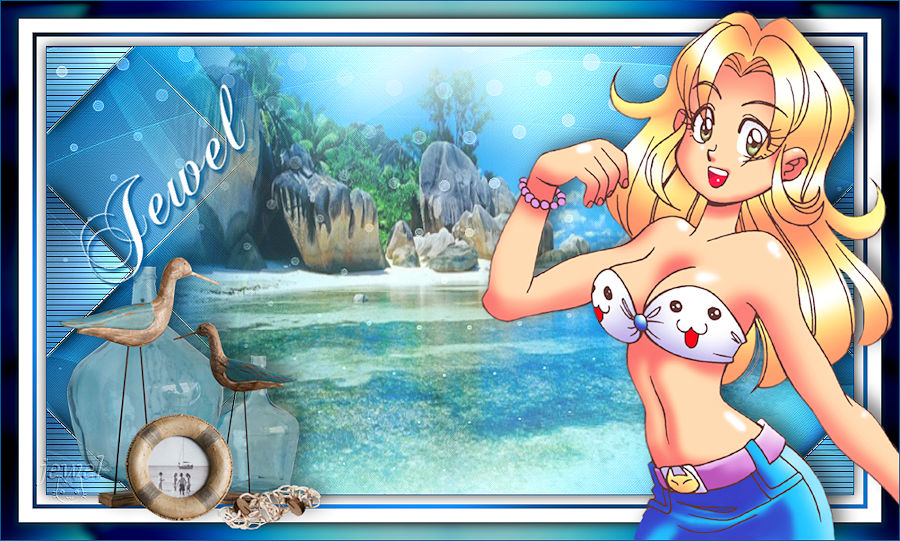
Sauvegarde Jewel

Colybrix, thank you very much for your permission that I may translate your tutorials

Tutoriel original ici
***

***
Plugins
Graphic Plus
Plugin Galaxy
AP -Lines
***
Colors
Foreground #30385e
Background #d3d5e3

***
1 - Open a new transparent image 900 px * 500 px
Gradient Linear

2 - Fill the layer with gradient
Adjust - Blur - Gaussian blur 20
3 - Layers - Duplicate
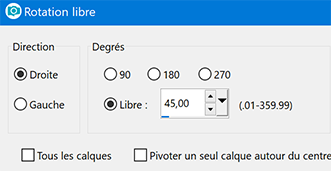
Image - Free rotate
4 - Layers - Duplicate
Image - Mirror
Opacity 75%
5 - Layers - Merge - Merge visible
6 - Effects - Edge effects - Enhance 2 times
7 - Effects Graphic Plus – Cross Shadow
Default except Intensity at 50

8 - Effects - Image effects - Seamless Tiling

Result

9 - Image - Mirror
10 - Effects Plugin Galaxy – Instant Mirror
Vertical Right

11 - Selections - Load/Save - Load selection from disk "selection 1 Jewel"
Selection - Promote selection to layer
Effects AP – Lines – SilverLining - Horizontal

12 - Selections - Select none
13 - Layers - Duplicate
Image - Mirror
Layers - Merge down
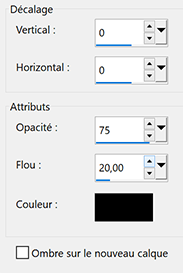
14 - Effects - 3D Effects - Drop Shadow

15 - Blend mode Multiply
Layers - Merge - Merge down
16 - Layers - New layer
Fill with the light color
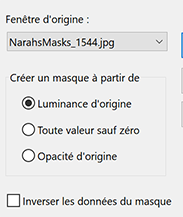
Layers – New mask layer from image – select Narah Mask 1544
17 - Effects - Edge effects - Enhance
Layers - Merge group
Blend mode Luminance (Legacy)
18 - Effects Graphic Plus – Cross Shadow
Settings in memory (intensity at 50 if you use it in Unlimited)
19 - Open "Paysage misted jewel 027"
Erase the watermark
Edit - Copy
Edit - Paste as a new layer
20 - Image - Resize 90% - resize all layers not checked
Opacity 70%
21 - Layers - New layer
Fill with white color
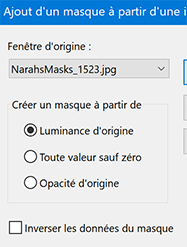
22 - Layers – New mask layer from image – select Narah Mask 1523
23 - Effects - Edge effects - Enhance
Layers - Merge group
Blend mode Lumonance (Legacy)
24 - Layer palette – Click the bottom layer
Copy
25 - Image – Add borders
1 px dark color
Selections - Select all
26 - Image – Add borders 10 px white color
27 - Effects - 3D Effects - Drop Shadow
28 - Selections - Select all
Image – Add borders 5 px dark color
29 - Selections - Invert
Effects Graphic Plus – Cross Shadow (default)

Selections - Select none
30 - Image – Add borders 15 px white color
31 - Selections - Select all
32 - Image – Add borders 20 px dark color
Selections - Invert
33 - Paste the background into the selection (in memory)
Adjust - Blur - Gaussian blur 5
34 - Ajust - Brightness and Contrast
My settings (Adapt if you want)

35 - Selections - Invert
Effects - 3D Effects - Drop Shadow (in memory) 2 times
36 - Selections - Select none
37 - Open "Buste femme jewel 0046"
Erase the watermark
Edit - Copy
Edit - Paste as a new layer
38 - Place on the right
Effects - 3D Effects - Drop Shadow

39 -Open " Gabry fiore bianco 72"
Edit - Copy
Edit - Paste as a new layer
Image - Resize 50% - resize all layers not checked
Place at the bottom left
Effects - 3D Effects - Drop Shadow (in memory)
40 - Open " title Jewel" (or write your own)
Edit - Copy
Edit - Paste as a new layer
Tool select (K)

41 - Effects - 3D Effects - Drop Shadow (dark color)

42 - Do the drop shadow a second time - same settings
43 - Add your watermark
44 - Image – Add borders 1 px dark color
45 - Image - Resize 900 pixels - Resize all layers checked
Adjust - Sharpness - Sharpen
If you want, you can send me your version
If you have problems, or you find a not worked link, write to me

Deux autres versions avec des tubes perso

|
|
|
|