-
Perfect Harmony


Colybrix, thank you very much for your permission that I may translate your tutorials

Tutoriel original ici
***

***
Plugins
Filters Unlimited – Bkg Designer Sf10I
Carolaine and Sensibility
Alien Skin Eye Candy 5 : Impact
Simple
***
Foreground color #4f0310
Background color : #fcd1d0

***
1 - Open Alpha layer – Window / duplicate
We work on the copy
2 - Radial Gradient
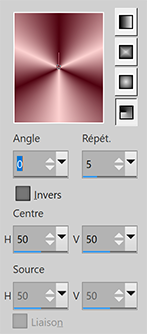
Fill with the gradient
3 - Adjust – Blur – Gaussian blur 15
Layers - Duplicate
Filters Unlimited – Bkg Designer Sf10I – ALFs Border Mirror Bevel (by default)

4 - Image effects – Seamless Tiling – by default
Opacity 85%
Merge - Merge down
5 - Selections - Load - Save selection - Load Selection 1 from Alpha Channel
Layers - New layer
Background ........... white color
Fill with white color
Selections - Modify - Contract 3 pixels
Erase
6 - Flood Fill opacity 50
Fill with the gradient - Background white color

Selections - Select none
7 - Image effects – Seamless Tiling – by default
Blend mode Overlay
8 - Selections - Load - Save selection - Load Selection 2 from Alpha Channel
Flood Fill 100
Layers - New layer
Fill with white color
Selections - Modify - Contract 3 pixels
Erase
8 bis - Flood Fill opacity 50
Fill with the gradient
Selections - Select none
9 - Image effects – Seamless Tiling – by default
Layers - Arrange - Move down
Result

Flood Fill 100%
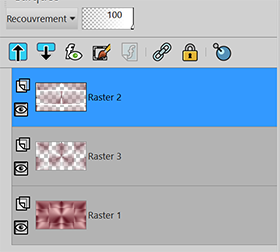
10 - Stay on the middle layer (Raster 3)
Effects - Carolaine and Sensibility – CS-LDots by default
11 - Move on the top layer (raster 2)
Effects - Carolaine and Sensibility – CS-DLines by default
Merge - Merge visible
12 - Selections - Load - Save selection - Load Selection 1 from Alpha Channel
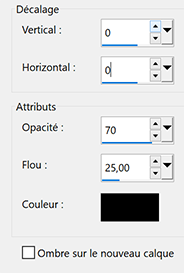
Effects – 3D effects – Drop shadow
13 - Selections - Load - Save selection - Load Selection 2 from Alpha Channel
Effects – 3D effects – Drop shadow (same settings)
Selections - Select none
14 - Layers - New layer
Flood Fill 100%
Fill with white color
Layers – New mask layer from image – select Narah Mask 1536
Effects - Edge effects - Enhance
Layers - Merge group
Blend mode Luminance (Legacy) - Opacity 75%
15 - Open "Fleur 86 Coly"
Edit - Copy
Edit - Paste as a new layer
Image - Mirror
Image - Resize 70 % - resize all layers not checked
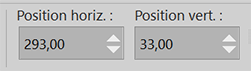
16 - Tool select (K)
Effects – 3D effects – Drop shadow (same settings)
17 - Effects – Alien Skin Eye Candy 5 : Impact – Perspective Shadow
Choose the preset Perfectharmony-coly
or these settings

18 - Copy and paste as a new layer "Déco 1"
on my second version - I modified the color with the Brush tool - Change to Target
Tool select (K)

Blend mode Luminance (Legacy)
Adjust - Sharpness - Sharpen
19 - Layers - Duplicate
Image - Mirror
Image - Flip
Layers - Arrange - Move down 2 times (to place it under the flower tube)
20 - Move to the background layer (Merged)
Layers - Duplicate
Arrange - Bring to top
Effects - Geometric Effects - Circle - transparent checked
21 - Effects - Geometric Effects - Spherize

22 - Image - Resize 10 % resize all layers not checked
Tool select (K)

23 - Alien Skin Eye Candy 5 : Impact - Glass
Choose the preset PerfectHarmony Glass Coly
24 - Effects Simple - Top Left Mirror
Opacity 70%
For my second version, I moved this layer under the flowers
25 - Copy and paste as a new layer the "texte titre"
Image - Resize 73 % - resize all layers not checked
Image - Negative image
26 - Tool select (K)

Effects – 3D effects – Drop shadow (foreground color)

27 - Move to the background layer (Merged)
Edit - Copy
28 - Image – Add borders
1 pixel – dark color
3 pixels – white color
1 pixel – dark color
3 pixels – white color
1 pixel – dark color
30 pixels – white color
1 pixel – dark color
3 pixels – white color
1 pixel – dark color
3 pixels – white color
1 pixel – dark color
40 pixels – couleur blanche
1 pixel – couleur foncée
29 - Magic Wand Tool – Select white border (40 pixels)
Paste into the selection (background in memory)
Adjust – Blur – Gaussian blur 15
30 - Promote selection to layer - blend mode Multiply
Effects – Carolaine and Sensibility - CS LDots by default
Effects – Carolaine and Sensibility - CD DLines by default
31 - Merge - merge down
32 - Selections - Select all
Selections - Modify contract 41 px
Effects – 3D effects – Drop shadow

33 - Keep the selection
Selections - Modify contract 39 px
Effects – 3D effects – Drop shadow (dark color)

Selections - Select none
34 - Open "Transparent Butterfly Psd" - Layer "papillon 1" - Copy
Paste as a new layer
Image - Resize 55 % - resize all layers not checked
Tool select (K)
35 - "Transparent Butterfly Psd" Layer "papillon 2" - Copy
Paste as a new layer
Image - Mirror
Image - Resize 40 % - resize all layers not checked
Tool select (K)
36 - Effects – 3D effects – Drop shadow color 4

Add your watermark
Layers - Merge - Merge all
38 - Image - Resize to 950 pixels - Resize all layers checked
Save Jpg
If you want, you can send me your version
If you have problems, or you find a not worked link, write to me

Une autre version avec un tube de Tine

-
Commentaires
|
|
|
|