-
Valentine


Colybrix, thank you very much for your permission that I may translate your tutorials

Tutoriel original ici
***

***
Plugins
Funhouse
Graphic plus
AAA Frame
***
Foreground color # 28282
Background color # b60707

***
1 - Open a new transparent image 900 px * 550 px
Rectangular gradient

Fill the layer with the gradient
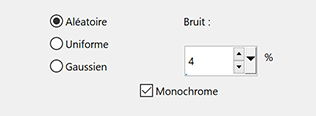
2 - Adjust - Add/Remove noise
3 - Effects – Funhouse - Angulate by default
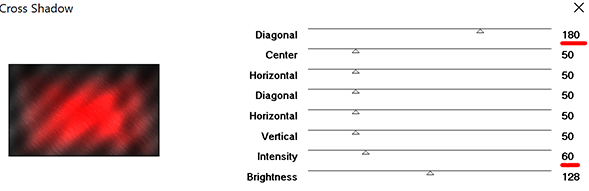
4 - Effects Graphic plus – Cross Shadow
5 - Layers - New layer
Fill the layer with white color
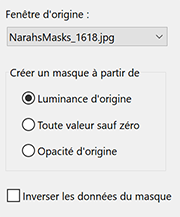
Layers – New mask layer from image – select Narah Mask 1618
Effects - Edge effects - Enhance
Layers - Merge group
Blend mode Overlay - Opacity 70
6 - Layers - New layer
Selections - Select all
3D Effects - Cutout

7 - Selections - Select none
Adjust - Add/Remove noise (same settings)
Layers - Duplicate
Image - Mirror
Image - Flip
Layers - Merge down
8 - Layers - New layer
Fill the layer with white color
Layers – New mask layer from image – select Narah Mask 1620

9 - Effects - Edge effects - Enhance
Layers - Duplicate
Layers - Merge group
Blend mode Luminance (Legacy)
10 - Open "visage20-coly"
Erase the watermark
Edit - Copy
Edit - Paste as a new layer
Image - Resize 75 % - resize all layers not checked
Tool select (K)

11 - Layers - Arrange move down 3 times
Result

12 - Activate layer 2 (effect cutout)
Layers - New layer
Rectangle selection tool - custom selection

Fill with the rectangular gradient
13 - Selections - Modify - contract 20 px
Delete
Selections - Modify - contract 20 px
Fill with the rectangular gradient
Selections - Select none
Blend mode Multiply
14 - Activate the top layer
Open "vase32-coly"
Erase the watermark
Edit - Copy
Edit - Paste as a new layer
Image - Resize 58 % - resize all layers not checked
Image - Mirror
Place on the left in the frame
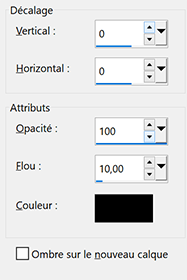
Effects – 3D effects – Drop shadow
15 - Image – Add borders 1 px red color
16 - Selections - select all
17 - Image - Add borders 50 px red color
Selections - Invert
18 - Fill with this linear gradient

19 - Selections - Promote selection to layer
Blend mode Multiply
Layers - Merge - Merge down
20 - Adjust - Add/Remove noise (same settings)
21 - Select - Invert
Effects – 3D effects – Drop shadow

Edit - Repeat Drop shadow
22 - Keep the selection
Optional: I found the edges of the image in the center, a little too dark gray, I wanted them more black
Tool Burn - size 100 - Rigidité 0 - Opacity 50

I went a little bit around the edges of the central image
I put white arrows to indicate the places where I passed
Before

After

Selections - Select none
23 - Effet AAA Frame – Foto Frame 10, 0, 0, 1, 0, 0, 0, 100
24 - Open "StValentin5-creacoly" ........... Select one of the hearts of your choice
Edit - Copy
Edit - Paste as a new layer
Image - Resize 45 % - resize all layers not checked
Image - Free rotate - left and 35
Place top left
25 - Layers - Duplicate
Image - Mirror
Layers - Merge - Merge down
Effects – 3D effects – Drop shadow (same settings)
Add hearts if you want
26 - Add Title ou write yours
My settings

27 - Effects – 3D effects – Drop shadow - white color

28 - Add your watermark
Image - Add borders 1 px red color
Image - Resize 950 px - resize all layers checked
Save as Jpg
If you want, you can send me your version
If you have problems, or you find a not worked link, write to me

Une autre version avec des tubes de Tine
-
Commentaires
|
|
|
|