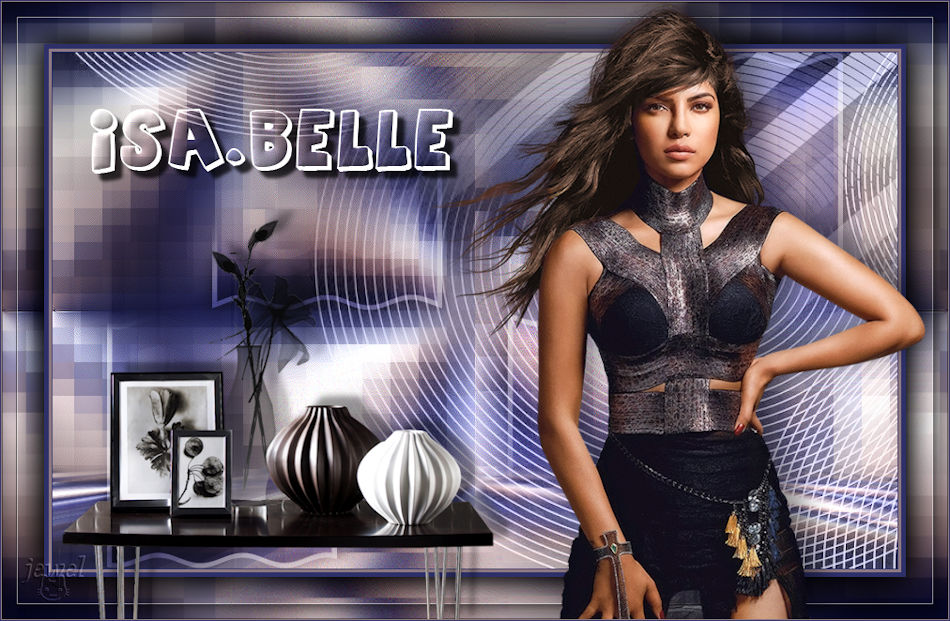
-
Par jewelAnnie le 18 Mars 2021 à 08:00

Colybrix, thank you very much for your permission that I may translate your tutorials

Tutoriel original ici
***

***
Plugins
Mehdi
Phpshares-hdj1 (Patched filter, in the material)
Graphic Plus
Mura’s Meister
AAA Frame
***
Colors
Color 1 > foreground : #77193a
Color 2 > background : #f3c3d6
Color 3 : #ffffff
Color 4 : #4a694a

***
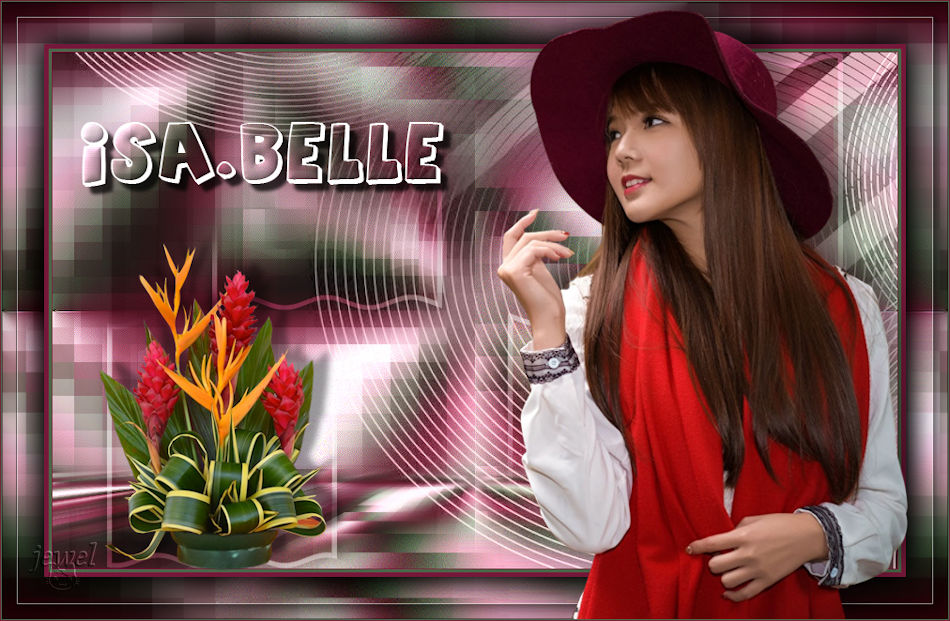
1 - Open a new transparent image 900 px * 550 px
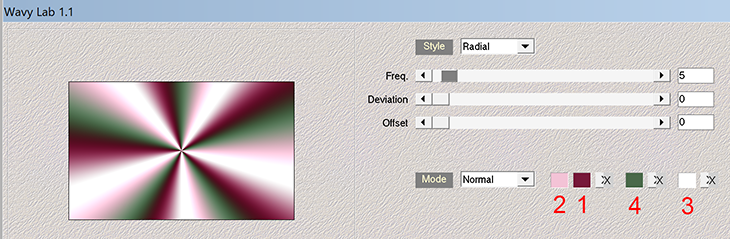
Effects Mehdi – Wavy Lab 1.1
2 - Adjust - Blur - Gaussian blur 15
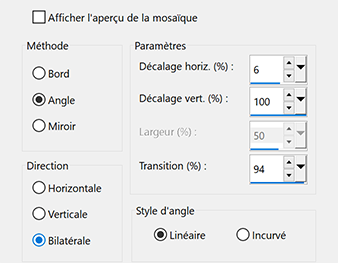
Effects - Image effects - Seamless Tiling

3 - Effects - Reflection effects - rotating mirror

Effects - Edge effects - Enhance X 2
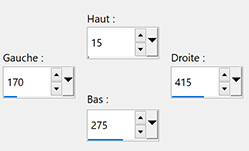
4 - Selection Tool (S) - Custom selection

Selections – Promote selection to layer
Selections - Select none
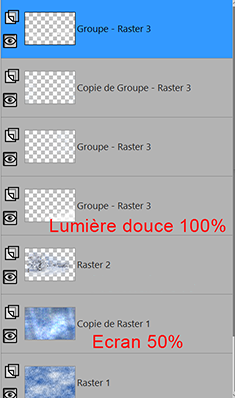
5 - Layers - Duplicate
Image - Mirror horizontal
Effects Phpshares-hdj1 > Nina à 170

6 - Activate de middle layer
Effects Phpshares-hdj1 > missery à 30

7 - Activate the top layer
Layers - Merge - Merge down
Effects - Image effects - Seamless Tiling - same settings
Blend mode Multiply
8 - Layers - Merge - Merge down
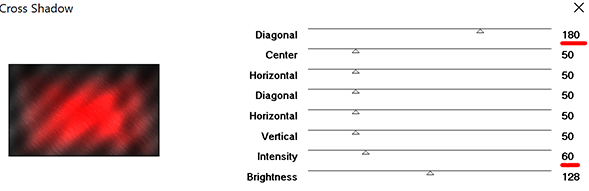
Effects – Graphic Plus Cross Shadow

9 - Layers - Duplicate
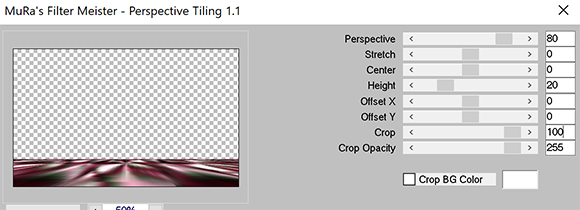
Effects Mura’s Meister > Perspective Tiling
Magic Wand Tool – Select the transparent part of the layer
Selections - Modify - Feather 30 / Ctrl-H
10 - Press 6 times on the erase / Delete key on the keyboard
Selections - Select none
11 - Layers - new layer
Fill the layer with the white color
Layers – New mask layer from image – select Narah Mask 1624
Layers - Merge group
12 - Layers - Duplicate
Layers - Merge - Merge down
Blend mode Luminance ( Legacy)
13 - Activate the bottom layer (Raster 1)
Selection Tool (S) - Custom selection
14 - Selections – Promote selection to layer
Layers - Arrange - Bring to top
Selections - Modify- Select Selection borders
Fill with the white color
Selections - Select none
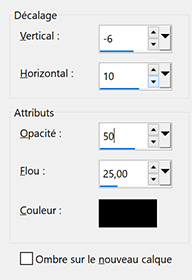
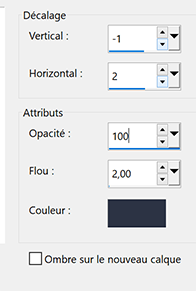
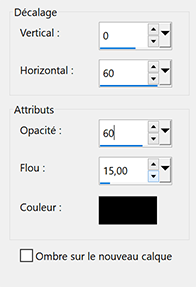
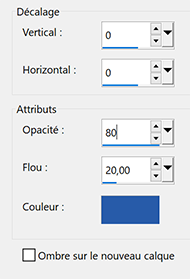
15 - Effects – 3D effects – Drop shadow 0, 0, 100, 25 black
Effects - Image effects - Seamless Tiling
Tool select (K) horiz. : 37, vert : -6
16 - Activate the bottom layer
Selections - Select all
Activate the top layer
Image - Crop to selection
17 - Effects - Distorsion Effects - Wave

Blend mode Soft Light (or other if you want)
18 - Layers - Duplicate
Image - Mirror
Image - Flip
19 - Activate Group Layer (raster2)
Layers - Arrange - Bring to top
Layers - Duplicate
Opacity 50%
20 - Activate layer bottom (Raster 1)
Edit - Copy
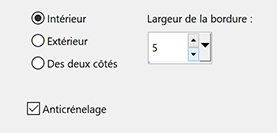
21 - Image – Add borders
1 pixel – foreground color
3 pixels – color 4
5 pixels foreground color
22 - Selections – Select all
Image – Add borders 45 pixels foreground color
23 - Selections - Invert
Edit - Paste into selection (raster 1 in memory)
Selection Invert
Effects – 3D effects – Drop shadow 0, 0, 100, 50 black
Edit - repeat drop shadow
Selections - Select none
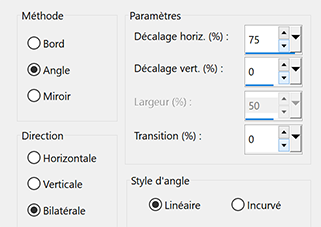
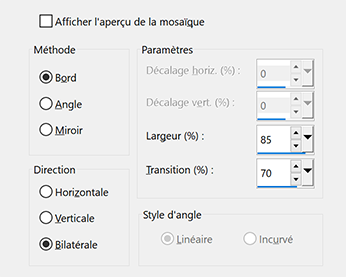
24 - Effects AAA Frame > Foto Frame

25 - Open "femme805-coly" - Erase the watermark
Edit - Copy
Edit - Paste as a new layer
Image - Resize 80 % - Resize all layers – not checked
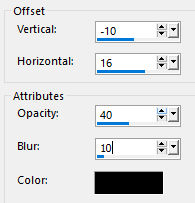
Effects – 3D effects – Drop shadow -10, 16, 40, 35 black
26 - Open "big_artimage_846835_7736268_20180603284620" - Erase the watermark
Edit - Copy
Edit - Paste as a new layer
Image - Resize 65 % - Resize all layers – not checked
Effects – 3D effects – Drop shadow
27 - Open "Titre en blanc" - I used the Agent Orange font
Edit - Copy
Edit - Paste as a new layer
Move top left
With the Magic Wand Tool - select inside letters and dots

28 - Activate layer bottom (Raster 1)
Selections - Modify - Expand 1 px
Promote selections to layer
Layers - Arrange - Move up X2 (under the text)
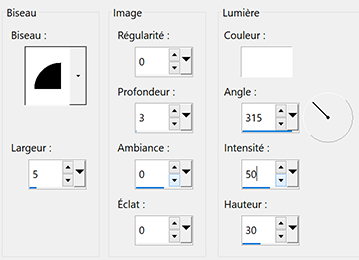
Effects - 3D Effects - Inner bevel

29 - Selections - Select none
Activate the top layer (the text)
Merge - Merge down
Effects 3D - Drop shadow : 8, 8, 75, 5 black
30 - Add your watermark
Image – Add borders
1 pixel – color 4
1 pixel – foreground color
31 - Image - Resize 950 pixels - Resize all layers checked
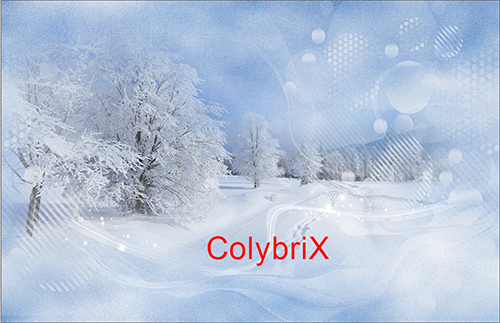
Save as Jpg
If you want, you can send me your version
If you have problems, or you find a not worked link, write to me

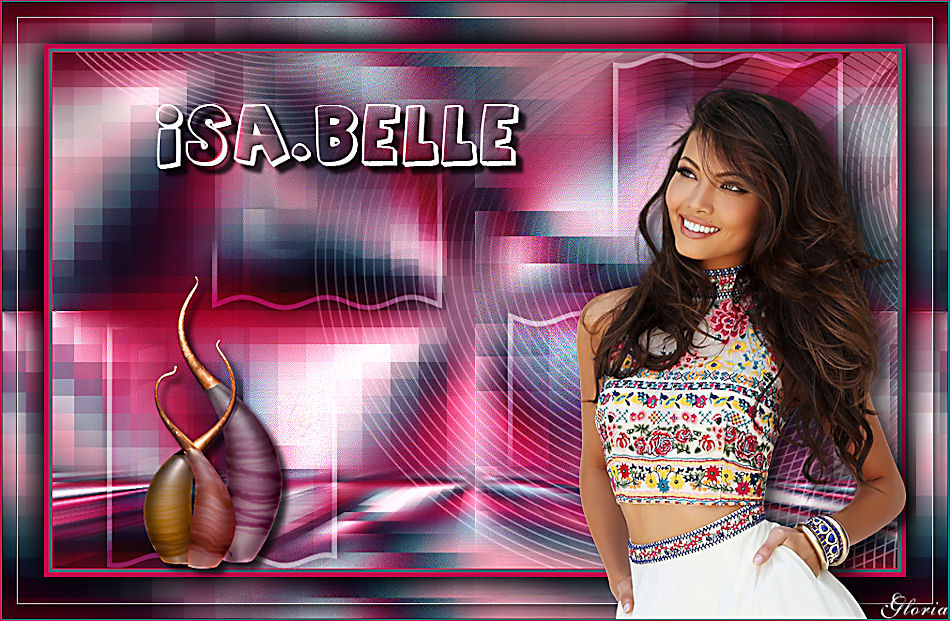
Une autre version avec un tube femme de Nadège et un tube déco de Guismo
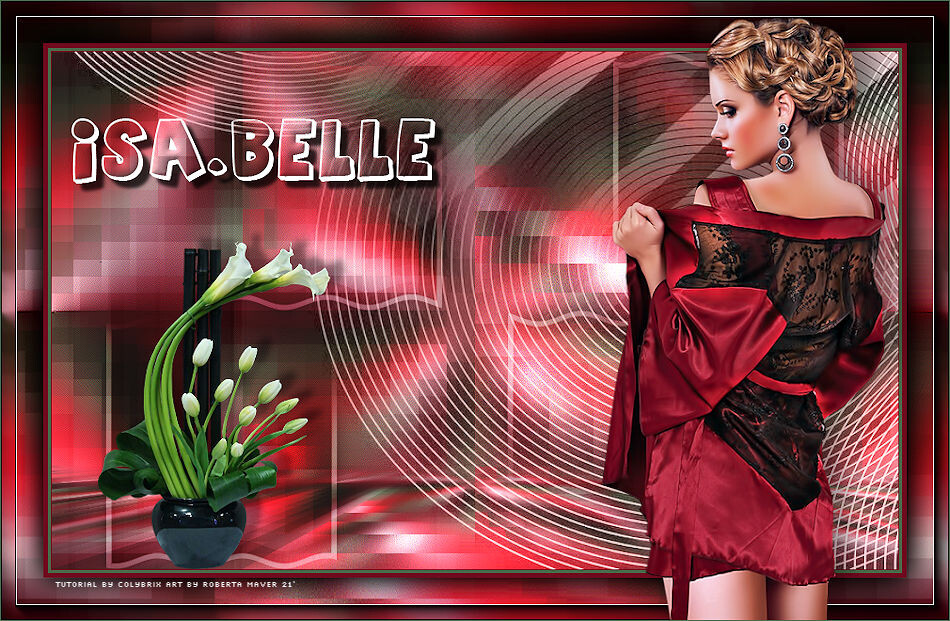
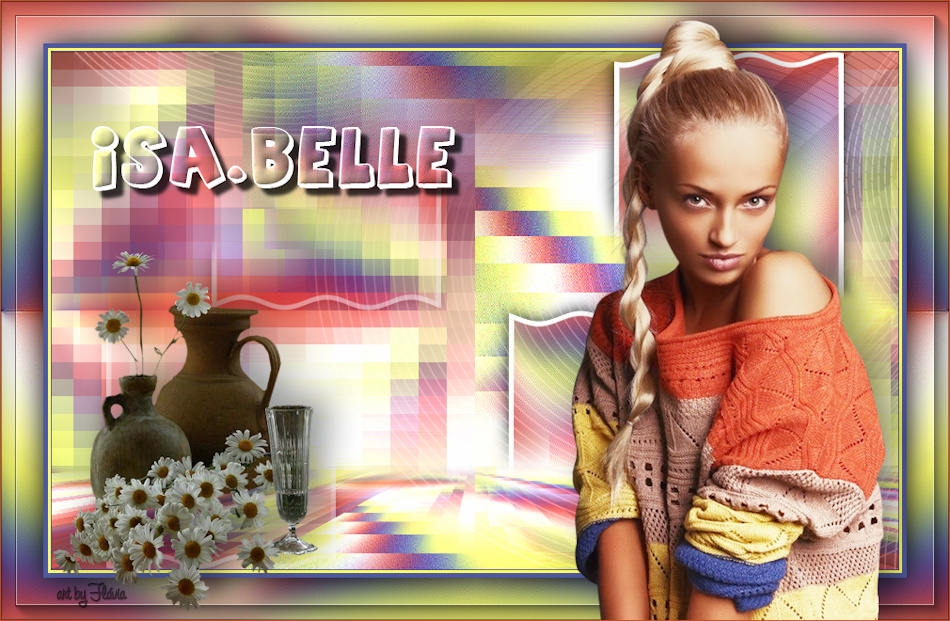
Thank you so much for the 3 versions Gloria


Thank you so much Roberta
Thank you so much Flavia
 votre commentaire
-
Par jewelAnnie le 2 Mars 2021 à 09:30


Colybrix, thank you very much for your permission that I may translate your tutorials
Tutoriel original ici
***
***
Plugins
&<BKg Designer sf10II
Graphic Plus
***
Foreground color # 2e3346
Background color # a3c3cd

1 - Sunburst gradient
2 - Open a new transparent image 900 px * 550 px
Fill the layer with the gradient
Adjust - Blur - Gaussian blur 15
3 - Layers - Duplicate
Image - Mirror
Blend mode Overlay
4 - Layers - New layer
Selections - Select all
Open "femme799-coly" - Edit - Copy
Edit - Paste into the selection
Selections - Select none
Effects - Image effects - Seamless Tiling by default
Adjust - Blur - Gaussian blur 30
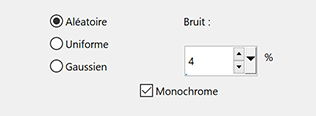
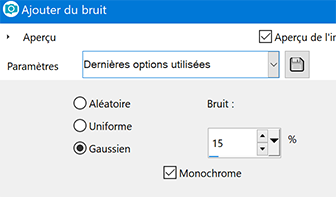
5 - Adjust - Add / Remove noise - Add noise

Merge - Merge visible
6 - Filters Unlimited - &<BKg Designer sf10II - Gregs FO Warp

7 - Effects Graphic Plus - Cross Shadow by default
Layers - Duplicate
Effects - Geometric effects - Perspective vertical -75

8 - View - Rulers (if not displayed)
Tool select (K)
go down the top edge to 400

9 - Magic Wand Tool – Select the transparent part of the layer
Selections - Modify - Feather 35 / Ctrl-H
10 - Press 5 or 6 times on the erase / Delete key on the keyboard
Selections - Select none
11 - Effects – 3D effects – Drop shadow (foreground color)

12 - Open "orage- coly" - Edit - Copy
Edit - Paste as a new layer
Tool select (K)

Blend mode Overlay (or other)
13 - Layers - New layer
Fill with white color
Layers – New mask layer from image – select Narah Mask 1594
Effects - Edge effects - Enhance
Layers - Merge group
14 - Merge - Merge visible
Edit - Copy
15 - Image – Add borders
2 pixels – dark color
3 pixels – white color
10 pixels – dark color
16 - Magic Wand Tool – Select the border 10 px
Effects Graphic Plus – Cross Shadow by default
Edit - Repeat Cross Shadow
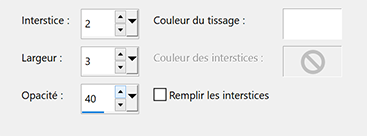
17 - Effects - Texture effects - Weave
18 - Effects - 3D Effects - Inner Bevel
19 - Selections - Select all
Image - Add borders 15 px white color
Effects – 3D effects – Drop shadow (foreground color)

Selections - Select none
20 - Image – Add borders
1 pixel – dark color
5 pixels – white color
1 pixel – dark color
5 pixels – white color
1 pixel – dark color
21 - Selections – Select all
Image – Add borders 35 pixels – white color
22 - Selections – Invert
Paste into the selection (in memory)
Adjust - Blur - Gaussian blur 5
23 - Selections – Promote selection to layer
Blend mode Multiply
Merge - Merge down
24 - Effects Graphic Plus - Cross Shadow by default except intensity 90
Adjust - Add / Remove noise - Add noise

Effects - 3D Effects - Inner Bevel - Same settings in memory
Selections - Select none
25 - Open "femme799-coly" - Erase the watermark
Edit - Copy
Edit - Paste as a new layer
Image - Mirror
Image - Resize 85 % - Resize all layers – not checked
Move right
Effects – 3D effects – Drop shadow
26 - Open "Texte Orage - Coly" - Erase the watermark
Edit - Copy
Edit - Paste as a new layer
Select tool (K)
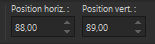
Image - Negative
Effects – 3D effects – Drop shadow - Dark color (or black)
27 - Open "fleche deco" - Edit - Copy
Edit - Paste as a new layer
Select tool (k) Position horiz : 465, Positon vert : 265
Effects – 3D effects – Drop shadow - same settings in memory
28 - Add your watermark
Image - Add borders 1 pixel – dark color
Image - Resize 950 pixels - Resize all layers checked
Save as Jpg
If you want, you can send me your version
If you have problems, or you find a not worked link, write to me
Une autre version avec un tube de Maryse
Thank you so much Gloria
 votre commentaire
-
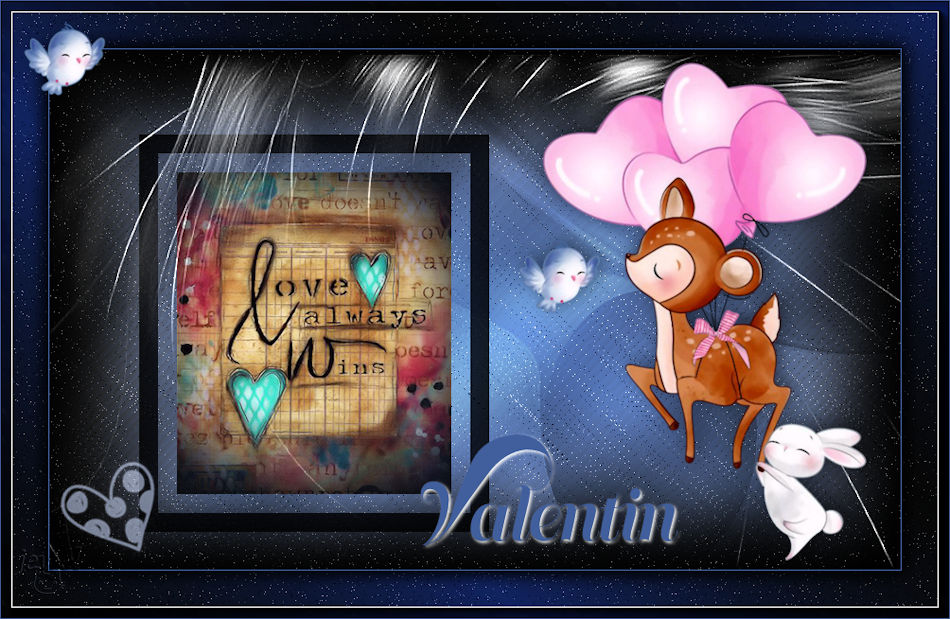
Par jewelAnnie le 20 Janvier 2021 à 08:00


Colybrix, thank you very much for your permission that I may translate your tutorials
Tutoriel original ici
***
***
Plugins
Funhouse
Graphic plus
AAA Frame
***
Foreground color # 28282
Background color # b60707

***
1 - Open a new transparent image 900 px * 550 px
Rectangular gradient

Fill the layer with the gradient
2 - Adjust - Add/Remove noise
3 - Effects – Funhouse - Angulate by default
4 - Effects Graphic plus – Cross Shadow
5 - Layers - New layer
Fill the layer with white color
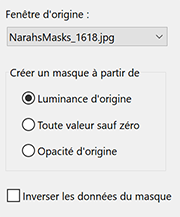
Layers – New mask layer from image – select Narah Mask 1618
Effects - Edge effects - Enhance
Layers - Merge group
Blend mode Overlay - Opacity 70
6 - Layers - New layer
Selections - Select all
3D Effects - Cutout

7 - Selections - Select none
Adjust - Add/Remove noise (same settings)
Layers - Duplicate
Image - Mirror
Image - Flip
Layers - Merge down
8 - Layers - New layer
Fill the layer with white color
Layers – New mask layer from image – select Narah Mask 1620

9 - Effects - Edge effects - Enhance
Layers - Duplicate
Layers - Merge group
Blend mode Luminance (Legacy)
10 - Open "visage20-coly"
Erase the watermark
Edit - Copy
Edit - Paste as a new layer
Image - Resize 75 % - resize all layers not checked
Tool select (K)

11 - Layers - Arrange move down 3 times
Result

12 - Activate layer 2 (effect cutout)
Layers - New layer
Rectangle selection tool - custom selection

Fill with the rectangular gradient
13 - Selections - Modify - contract 20 px
Delete
Selections - Modify - contract 20 px
Fill with the rectangular gradient
Selections - Select none
Blend mode Multiply
14 - Activate the top layer
Open "vase32-coly"
Erase the watermark
Edit - Copy
Edit - Paste as a new layer
Image - Resize 58 % - resize all layers not checked
Image - Mirror
Place on the left in the frame
Effects – 3D effects – Drop shadow
15 - Image – Add borders 1 px red color
16 - Selections - select all
17 - Image - Add borders 50 px red color
Selections - Invert
18 - Fill with this linear gradient

19 - Selections - Promote selection to layer
Blend mode Multiply
Layers - Merge - Merge down
20 - Adjust - Add/Remove noise (same settings)
21 - Select - Invert
Effects – 3D effects – Drop shadow

Edit - Repeat Drop shadow
22 - Keep the selection
Optional: I found the edges of the image in the center, a little too dark gray, I wanted them more black
Tool Burn - size 100 - Rigidité 0 - Opacity 50

I went a little bit around the edges of the central image
I put white arrows to indicate the places where I passed
Before

After

Selections - Select none
23 - Effet AAA Frame – Foto Frame 10, 0, 0, 1, 0, 0, 0, 100
24 - Open "StValentin5-creacoly" ........... Select one of the hearts of your choice
Edit - Copy
Edit - Paste as a new layer
Image - Resize 45 % - resize all layers not checked
Image - Free rotate - left and 35
Place top left
25 - Layers - Duplicate
Image - Mirror
Layers - Merge - Merge down
Effects – 3D effects – Drop shadow (same settings)
Add hearts if you want
26 - Add Title ou write yours
My settings

27 - Effects – 3D effects – Drop shadow - white color

28 - Add your watermark
Image - Add borders 1 px red color
Image - Resize 950 px - resize all layers checked
Save as Jpg
If you want, you can send me your version
If you have problems, or you find a not worked link, write to me
Une autre version avec des tubes de Tine
 votre commentaire
-
Par jewelAnnie le 27 Décembre 2020 à 13:20


Colybrix, thank you very much for your permission that I may translate your tutorials
Tutoriel original ici
***
***
Plugins
Simple
Photo Effex
Plugin Galaxy
Eye Candy 5 Impact
***
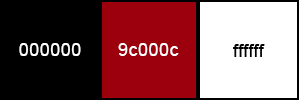
Foreground color #000000
Background color #9c000c
***
1 - Open Alpha layer – Window / duplicate (Ctrl D)
We work on the copy
Sunburst gradient

2 - Fill with the gradient
Effects - Image effects - Seamless Tiling - Side by side
3 - Effects - Image effects - Seamless Tiling (by default)

4 - Effects Simple - Blintz
Edit – Repeat Blintz
Effects - Edge effects - Enhance x2
5 - Effects Simple - Half Wrap
6 - Effects - Reflexion effects - Rotating Mirror

7 - Effets – Plugin Galaxy – Instant Mirror - Vertical Left

8 - Effects Photo Effex - Scanlines (by default)
9 - Layers – New raster layer
Fill the layer with white color
Layers – New mask layer from image – select the Narah mask 1603
Effects – Edge effects -Enhance
Layers – merge – merge group
10 - Image - Resize 50 % - resize all layers not checked
Effects - Image effects - Seamless Tiling - Side by side
Layers - Duplicate
Opacity 50%
Layers - Merge - Merge down
Blend mode Luminance (Legacy)
11 - Layers – New raster layer
Fill the layer with white color
Layers – New mask layer from image – select the Narah mask 1543
Effects – Edge effects -Enhance
Layers – merge – merge group
12 - Layers – New raster layer
Fill the layer with white color
Layers – New mask layer from image – select the Narah mask 1605
Effects – Edge effects -Enhance
Layers – merge – merge group
13 - Effects – 3D effects – Drop shadow (BG Color)

14 - Open "main-doigt-coly" Erase the watermark
Edit - Copy
Edit - Paste as a new layer
Image - Resize 40 % - resize all layers not checked
Objects - Align left
Layers - Arrange - Move down
Effects – 3D effects – Drop shadow

15 - Active the top layer
16 - Open "MR_Jupe rose rouge" Erase the watermark
Edit - Copy
Edit - Paste as a new layer
Image - Mirror
Image - Resize 80 % - resize all layers not checked
Objects - Align right
Adjust - Sharpness - Sharpen
Effects – 3D effects – Drop shadow
16 - Layers - New layer
Selections - Load - Save selection - Load Selection 1 from Alpha Channel
Fill with the gradient - Invert checked

17 - Alien Skin Eye Candy 5 : Impact - Glass - Setting Clear
Selections - None
18 - Layers - Duplicate
Tool select (K)

19 - Open "titre" Erase the watermark
Edit - Copy
Edit - Paste as a new layer
Image - Negative
Effects – 3D effects – Drop shadow
20 - Active the background layer - Raster 1
Edit - Copy
Save your work before running the script for safety
21 - File - Script - Run
on Restricted Scripts Folderand at the top of the window - select the script "bordColy-Always in love"
put interactive at the bottom if you want to change the colors
(Silent if you want to keep my colors)

Go to step 22 if all is well with the script
If you have problems with the script here is the detail
(don't forget to copy the background before starting)
Image - Add borders
1 pixel – black color
1 pixel – background color (red)
1 pixel –black color
1 pixel – background color (red)
1 pixel – black color
1 pixel – background color (red)
Selections - Select all
Image – Add borders
40 pixels - white color
Effects – 3D effects – Drop shadow

Selections - None
Image – Ajdd borders
1 pixel – background color (red)
1pixel – black color
1pixel – background color (red)
Selections - Select all
20 pixels – white color
Selections - Invert
Edit - paste into the selection (Background in memory)
Selections - None
Image – Add borders
1 pixel – background color (red)
1pixel – black color
22 - Add your watermarkLayers - Merge - Merge all (Flatten)
Image - Resize 950 px - resize all layers checked
Save Jpeg
If you want, you can send me your version
If you have problems, or you find a not worked link, write to me
Une autre version avec un tube d'Athé

Merci Beatriz
 votre commentaire
-
Par jewelAnnie le 18 Décembre 2020 à 14:26


Colybrix, thank you very much for your permission that I may translate your tutorials
tuto original ici
****
****
Plugins
Mura’s Meister
Andrew ‘s Filters 25
Graphic plus
AAA Frame
****

Foreground #285ba9
Background #dde3eb
****
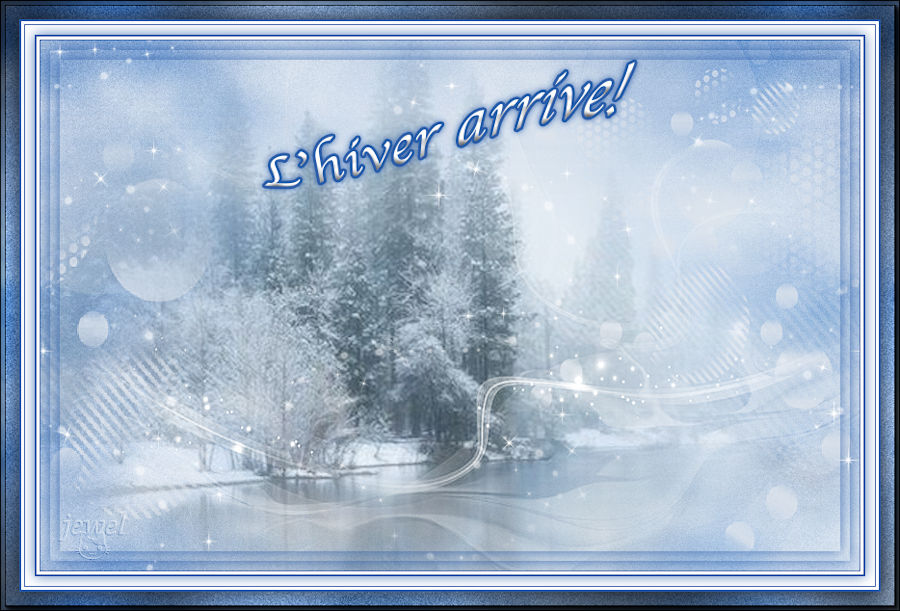
1 - Open a new transparent image 850 - 550 pixels
2 - Effects - Mura’s Meister Cloud by default
3 - Ajust - blur - gaussian blur 5
4 - Adjust - Add/remove noise - add noise
5 - Layers - Duplicate
Effects - Filters Unlimited - Andrew’s Filters 25 – A Right Dolly Mixture by default

6 - Effects Graphic plus – Cross Shadow

Blend mode Screen - Opacity 50%
7 - Open "paysghiver24-coly" - Erase the watermark
Edit - Copy
Edit - Paste as a new layer
Don't move
8 - Layers – New raster layer (Raster 3)
Fill the layer with white color
Layers – New mask layer from image – select the mask Narah _mask 1498

9 - Effects – Edge effects -Enhance
Layers – merge – merge group
Image - Mirror
Blend mode Soft Light
10- Tool select (K)

11 - Layers – New raster layer (Raster 3)
Fill with background color
Layers – New mask layer from image – select the mask Narah _mask 1500

12 - Effects – Edge effects -Enhance
Layers – merge – merge group
13 - Image - Mirror
14 - Image - Resize to 70 % - resize all layers not checked
Tool select (K)

15 - Layers - Duplicate
Effects - Image effects - Seamless Tiling
16 - Layers – New raster layer (Raster 3)
Fill the layer with white color
Layers – New mask layer from image – select the "creation.tine_masque215"

17 -
Effects – Edge effects -Enhance
Layers – merge – merge group
Your result
Your layers
18 - Merge - Merge visible
19 - Selections - Select all
Selections - Modify - Contract 10 px
Effects – 3D effects – Drop shadow (dark color)
20 - Selections - Modify - Contract 10 px
Effects – 3D effects – Drop shadow (same settings)
21 - Selections - Select none
22 - Open deco 1
Copy and paste as a new layer
Effects - Image effects - Seamless Tiling by default
23 - Active the bottom layer
Edit - Copy
Save your work before running the script for safety
24 - File - Scrit - Run
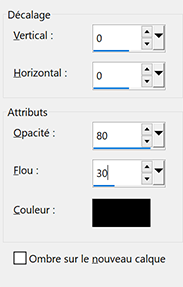
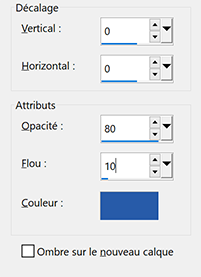
on Restricted Scripts Folderand at the top of the window - select the script "L'hiver arrive"put interactive at the bottom if you want to change the colors
(Silent if you want to keep my colors)
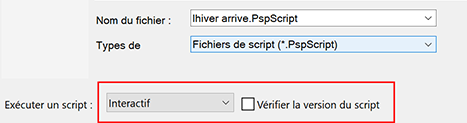
Go to step 28 if all is well with the script
If you have problems with the script here is the detail
(don't forget to copy the background before starting)
24 - Image - add borders
1 pixel – dark color
3 pixels – white color
2 pixels - dark color
Selections - select all
25 - Image - Add borders
10 pixels – White color
Effects – 3D effects – Drop shadow (same settings)
Selections - none
26 - Image - add borders
1 pixel – dark color
3 pixels – white color
2 pixels - dark color
Selections - select all
27 - Image - Add borders
20 pixels – white color
28 - Select - Invert
Paste into the selection (background in memory)
29 - Adjust - Blur - Gaussian blur 5
30 - Adjust - Add/remove noise - add noise (same settings in memory)
31 - Adjust - Brightness and contrast

32 - Effects Graphic plus – Cross Shadow

33 - Selections - Invert
34 - Effects – 3D effects – Drop shadow
Selections - None
35 - Open "Texte Titre" - Edit - Copy
Edit - paste as a new layer
Tool select (K)

36 - Effects – 3D effects – Drop shadow
Layers - Merge - Merge all (Flatten)
37 - Effet AAA Frame – Foto Frame

38 - Add your watermark
Layers - Merge - Merge all (Flatten)
39 - Image - Resize 900 px - resize all layers checked
If you want, you can send me your version
If you have problems, or you find a not worked link, write to me
Une autre version
Thank you so much Gloria
 votre commentaire
 Suivre le flux RSS des articles de cette rubrique Suivre le flux RSS des commentaires de cette rubrique


|
|
|
|