-

Colybrix, thank you very much for your permission that I may translate your tutorials

Original tutorial here
***

***
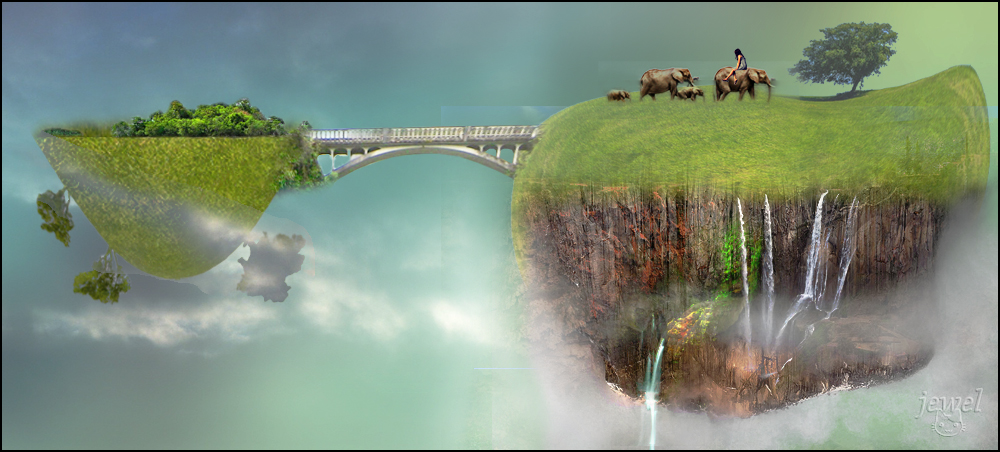
Preparation
Open tile or43 - Edit define pattern

The tile will be the last in your active patterns
Do the same with the Horizontal Gold tile
I put in the material the same tiles in silver tones if the colors of the gold tiles do not match your colors, in this case import the silver tiles
***
Dark color 170c0e
Light color efd6b4
Color 3 (title text): eaca1f

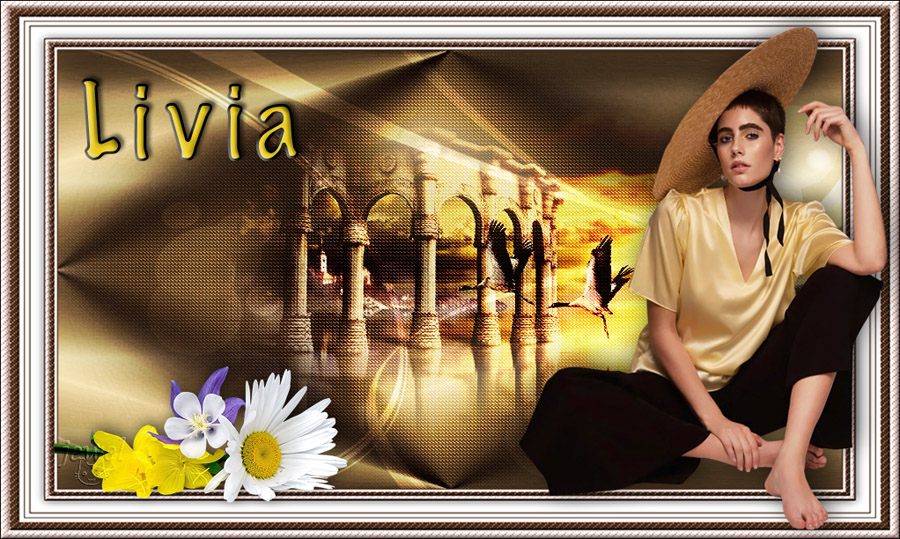
1 - Open the Alpha Livia layer (it contains selections)
Image - Duplicate, we work on the copy
2 - Fill the layer with the dark color
Open image Coly - mask38 - select all - copy
3 - On your work
New layer, fill with light color
Add a layer mask

Important : while holding down the Alt key, click on the white thumbnail of the layer mask in the layer window

The layer is white
4 - Ctrl V (paste) - your mask will paste into the layer mask

5 - Right click on the layer mask thumbnail
Apply the layer mask

6 - Deselect
7- Filter – Sharpen – Unsharp Mask

8 - Layer duplicate
Set the opacity of this layer to 50%
Layer Merge visible
9 - Image -Adjustements - brightness / contrast
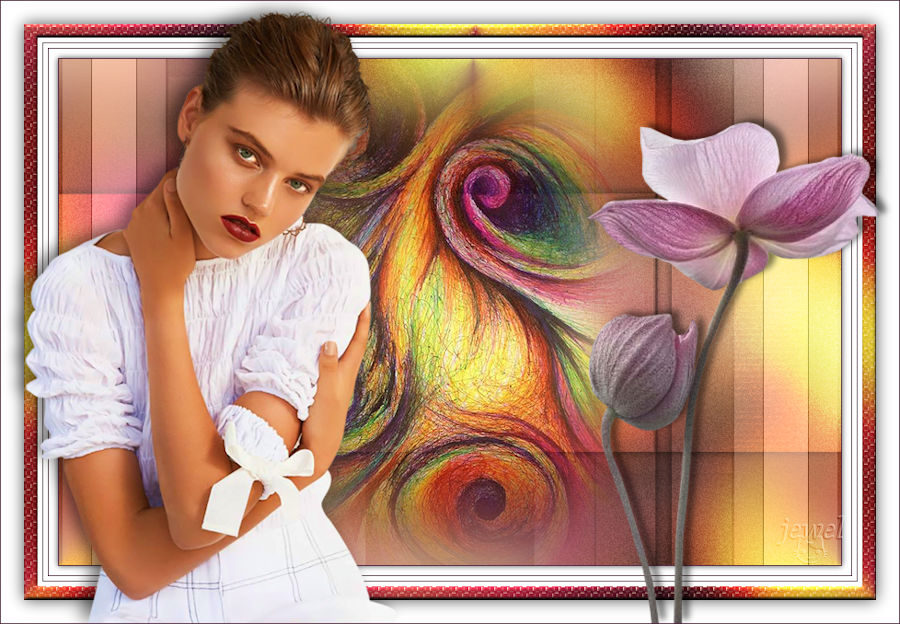
Result

10. Select - Load selection
Choose selection 1 in the scroll menu

11. Ctrl J (layer via copy)
Layer style
Pattern overlay - choose the 43 gold tile (or 223 silver according to your colors)

Drop shadow

12 - Go to the layer below (layer 2 copy)
Layer Style - Pattern Overlay - Choose Horizontal Gold Pattern

13 - Stay on the layer below (layer 2 copy)
Select - load the selection
Choose selection 2 in the scroll menu
14 - Image - Adjustements – brightness / contrast

Deselect
15 - Return to the top layer (layer 1)
New layer
Edit - Fill with white color
16 - Open the Coly-mask-14 mask
Select all - copy
17. Go back to your work, we do the same steps as for the previous mask
- Add a layer mask on the white layer
While holding down the Alt key, click on the white thumbnail of the layer mask in the layer window
Ctrl v ( edit - paste)
Right click on the layer mask thumbnail
Apply the layer mask
18 - Deselect
Set the opacity of this layer to 75% and change blend mode - Overlay
19 - Open the landscape mist 104
Using the lasso tool or Rectangular Marquee Tool at 0 - erase the watermark
Copy - paste on your work
Ctrl T (free transform)
Link checked put its settings (X - Y - L - H)

20 - Blend mode linear light mode (or other)
Move this layer under layer 2

21 - Merge visible layers (Do not flatten)
22. Image - canvas size (120 and 110)

23 - Open frame 18
Using Rectangular Marquee Tool, progressiveness to 0
Erase watermark in the center
24 - Select all - copy
Paste to your work - normally it is the right size
(To change the frame color on my 2nd version I made image-adjustments- Hue and saturation (ctrl u) with my dark color in the foreground
check colorize or redefine depending on the version,
move the saturation and brightness sliders to accentuate, darken or lighten if you wish)25 - Open Woman 761 Coly - remove the watermark
Copy - paste on your work
Ctrl T (free transform) with these settings

26 - Layer style - drop shadow

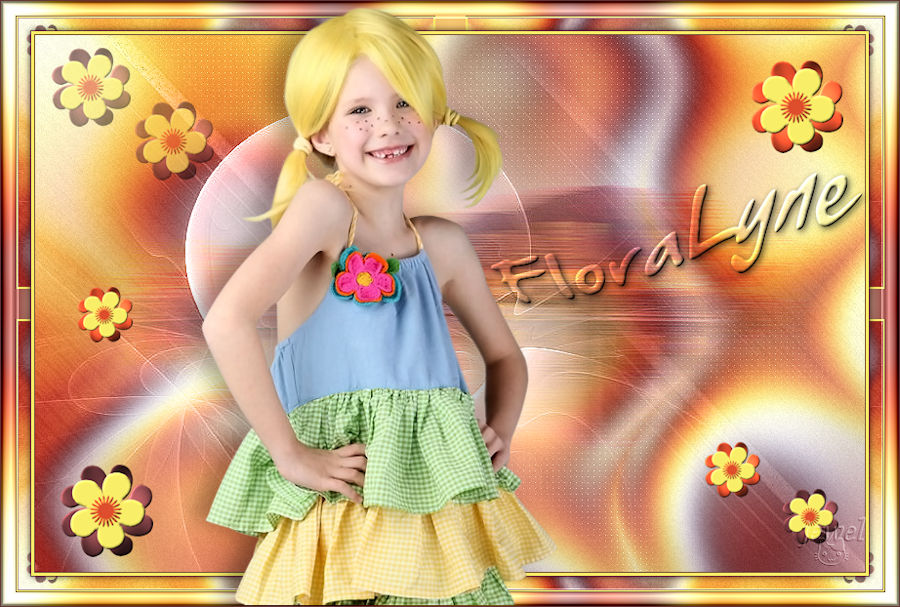
27 - Open the Title Livia tube
Copy - paste on your work
Move to top left
28 - Layer style
Color (I took a yellow color on the work : eaca1f)

Stroke (dark color)
Bevel and emboss (Inner bevel)

Drop shadow

29 - Open flower 76 Coly - remove the watermark
Copy - paste
Ctrl T free transform)

30 - Layer style - Drop shadow

31 - Add your watermark
Merge flatten all
32 - Image - Canvas size
2 pixels in Width and Height dark color
33 - Image - image size 900 pixels
If you want, you can send me your version
If you have problems, or you find a not worked link, write to me

Une autre version avec des tubes de Colybrix, Guismo et Tine

Thank you Win

 votre commentaire
-


Colybrix, thank you very much for your permission that I may translate your tutorials

tuto original ici
***
Woman tube 749 from Lily on this page
http://ma-galerie-paintshop-pro.eklablog.com/femmes-bustes-c29256934

Tine's abstract mist

***
Plugins Toadies
***
Foreground color #083370
Background color #d7fbfa

1 - Open the mask and tubes, remove signs
Open the Alpha layer provided in the material, Shift D (Window - Duplicate )
We work on the copy - this layer contains selections
2 - Fill with linear gradient 45 - 3

Adjust - Blur - Gaussian blur 15
3 - Layers - Duplicate
Image - Horizontal mirror
Change blend mode Multiply
Layers -Merge - Merge down
4 - Layers - New layer - Select all
Edit - Copy "misted abstrait Tine"
Edit - Paste in the selection
Deselect
5 - Effects - Image effects - Seamless Tiling by default
Adjust - Blur - Gaussian blur 30
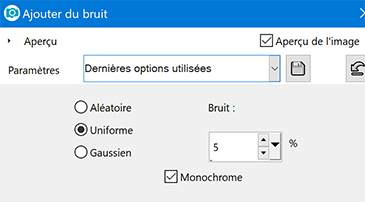
6 - Adjust - Add/Remove noise - Add noise

7 - Layers - Merge - Merge visible layers
8 - Layers - Duplicate
Change blend mode Overlay - Opacity 50%
Layers -Merge - Merge down
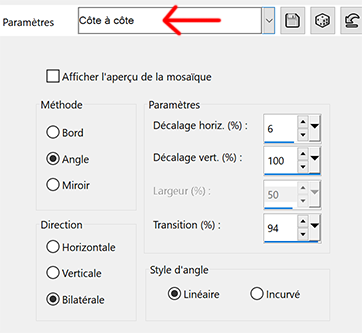
9 - Effects - Image effects - Seamless Tiling side by side

10 - Adjust - Brightness and contrast
(Adapt to your result, I wanted a darker background)

11 - Layers - New layer - fill with white color
Layers – New mask layer from image – select the mask 07 GB 2019

Merge group
Change the blend mode Overlay - Opacity 65
12 - With the eraser tool, delete the signature at the bottom right

13 - Selections – Load/Save selection – Load selection from alpha channel
Load selection #1Effects - 3D effects - drop shadow

14 - Selections – Load/Save selection – Load selection from alpha channel
Load selection #2
Select - Invert
Effects - 3D effects - drop shadow (same settings)
15 - Selections – Load/Save selection – Load selection from alpha channel
Load selection #3
Effects - 3D effects - drop shadow (same settings)
Deselect
16 - Copy and paste as a new layer "Tine's abstract mist"
resize to 50% - resize all layers not checked
Opacity 85%
Adjust - Sharpen - Sharpen
17 - Layers - new layer
Selections – Load/Save selection – Load selection from alpha channel
Load selection #4
Flood fill tool - opacity 50%
Fill with white color
Deselect
Effects Toadies - What are you

Effects - Edge effects - Enhance
Change the blend mode Luminance (Legacy)
18 - Layer - Duplicate
Image - Horizontal mirror
Flood fill tool 100%
19 - Activate the bottom layer
Edit - Copy
20 - Image - add borders 1 px dark color
21 - Select - select all
Image - Add borders 10 px white color
Effects - 3D effects - drop shadow

Deselect
22 - Image – Add borders
1 px dark color
5 px white color
1 px dark color
5 px white color
23 - Select - select all
Image – Add borders
15 px dark color
Select - Invert
24 - Layers- New layer
Paste in the selection background in memory)
Change blend mode Hard light
Layers - Merge - Merge down
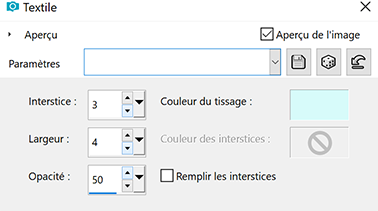
Effects - Textures effects - Weave
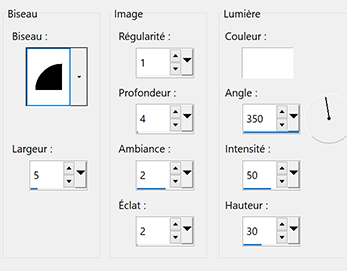
25 - Effects - 3D Effects - Inner bevel
26 - Select - select all
Image - Add borders 25 px white color
Effects - 3D effects - drop shadow
Deselect
28 - Copy and paste Meguy's flowers tube
Image - Horizontal mirror
Move on the right
Effects - 3D effects - drop shadow
29 - Copy and paste Woman tube
Image - Hizontal mirror
Image - Resize to 91 % - resize all layers not checked
Move to the left
Effects - 3D effects - drop shadow

Put your watermark
Image - Add borders 1 px dark color
31 - Resize to 900 px
Save in Jpg
If you want, you can send me your version
If you have problems, or you find a not worked link, write to me

Une autre version avec un tube femme de Colybrix , tube de fleurs d'Ann
Thank you Lucia
 1 commentaire
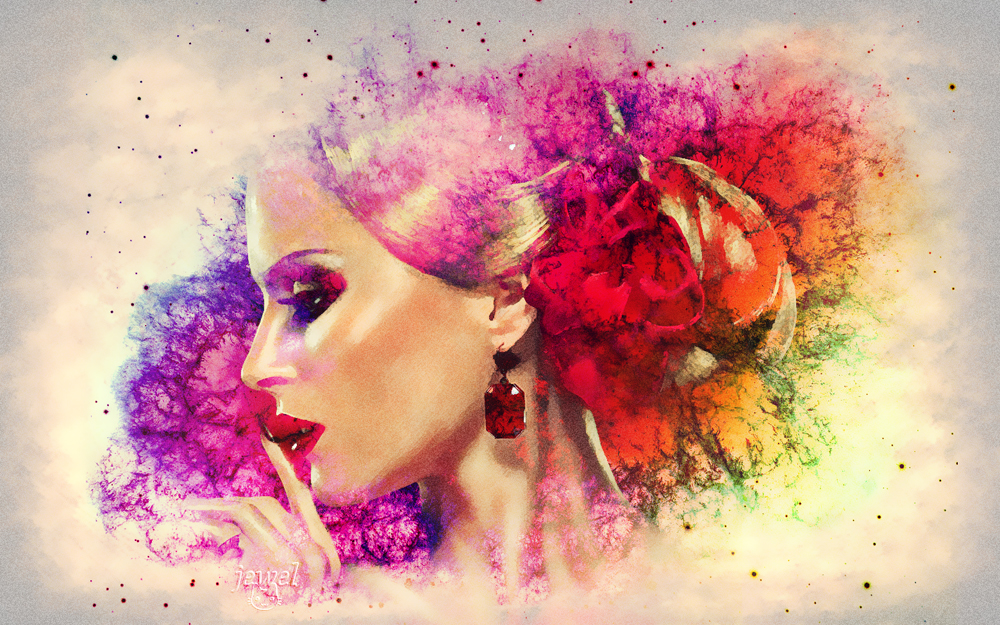
-


Colybrix, thank you very much for your permission that I may translate your tutorials

Tuto original ici
***
***
Colors
Foreground : d8e5e1
Background: 273e22

1 - Open Alpha layer
Image - Duplicate to make a copy
Close the original.
The copy, that will be the basis of your work, is not empty,but contains selections and guide
2- Gradient tool (G)– Reflected – foreground – background

Pull the gradient from the marker to the top edge, holding down the shift key to go straight

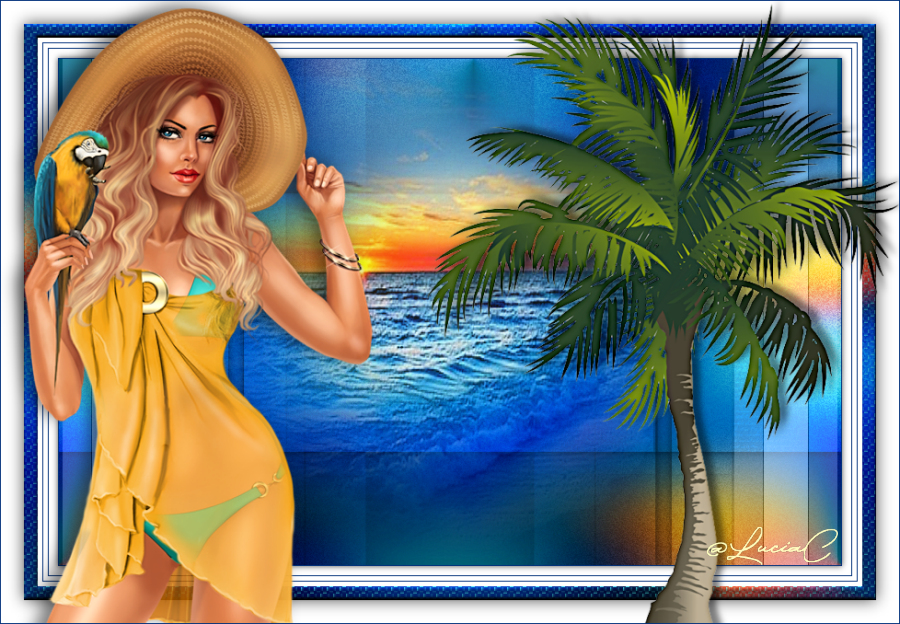
Result

3 - Filter – Blur - Gaussian blur at 20
4 – Layer - duplicate – multiply mode
Layer – Merge down (Ctrl + E)
5. Filter – Distort – Polar coordinates
Rectangular to polar

6. Layer – New layer - click X to invert the colors
Do the same gradient as before with your inverted colors
result

7- Add a layer mask
8 - Open Narah mask 1592 (it is resized)
Select – All – copy (ctrl a – ctrl c)
9 - Go back to your layer with the layer mask
Press while holding the Alt key on the thumbnail of the merge mask in the layer window
The layer is white
Edit – copy (ctrl v)
The mask goes in the layer mask
Right click on the layer mask – Apply the layer mask
Select - Deselect
10 - View, clear guides
11. Filter – Sharpen - unsharp mask

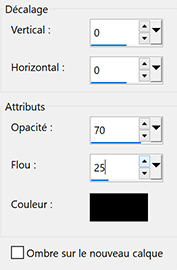
12 – Layer style – Drop shadow (dark color)

Blend mode Hard light (or other according to your colors)
Result

13 – Layer – New layer – Edit - Fill with white color

14 - Open Narah mask 1337 resized
Select – All – copy (ctrl a – ctrl c)
Go back to the white layer, add a layer mask
Click while holding the Alt key on the thumbnail of the merge mask
Edit - Copy (ctrl v)
The mask goes in the layer mask
Right click on the mask layer – Apply the layer mask
Select - Deselect
15 - Blend mode Overlay
16 – Layer – New layer
Select – Load selection
Choose selection 1 in the scroll menu
17 – Fill with the light color
Filter – Texture – texturiser (sandstone)
Deselect
18 - Filter – Distort – Pinch

Keyboard key Ctrl F to remake the filter
Remake Ctrl F
The effect is applied 3 times in total
19 – Layer style - stroke - inside

Drop shadow
20 – Layer - Duplicate
Ctrl t (free transform)
Right click, flip vertical
Place at the bottom
Settings (H ......minus 100 )

21 - Layer – new layer
Select – Load selection
Choose selection 2 in the scroll menu
Fill with the light color
Deselect
Blend mode Linear light (or other)
22 – Layer – Flatten image
23 – Open « vase 81-Coly », erase the watermark
Copy – Paste as a new layer
Ctrl T (free transform)
My settings

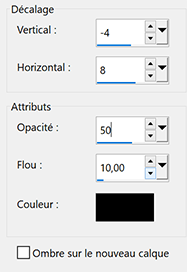
Layer style - Drop shadow
24 – Calque – new layer
Select – Load selection
Choose selection 3 in the scroll menu
Fill with the light color
Deselect
25 – Layer style - Drop shadow

Stroke - center – color 59705e

Bevel and Emboss

26 - Layer – Flatten image
27 - Image – canvas size
4 pixels – dark color
6 pixels – light color
4 pixels – dark color
30 pixels – white color
28 - Select the white border with the magic wand tool (W)

Select - Invert
Ctrl J (new – layer via copy)
Layer style - Drop shadow
29- Layer – Flatten image
30 - Image – canvas size
2 pixels – dark color
10 pixels – white color
2 pixels – dark color
60 pixels – white color
31 - Select the white border with the magic wand tool (W)
Gradient tool (foreground light color , background dark color)
Reflected gradient

Pull the gradient from the center to the top edge, holding down the shift key to go straight

32 - Ctrl J (layer – layer via copy)
Layer style - Inner shadow

33 - Open « femme 71-Coly », erase the watermark
Copy and paste as a layer
Ctrl T (free transform)
My settings

34 – Layer style – drop shadow

35 – Add your watermark
Layer – Flatten image
36 - Image – canvas size
2 pixels – dark color
37 – Image – Image size – 900 pixels
If you want, you can send me your version
If you have problems, or you find a not worked link, write to me
Une autre version avec un tube de LB-Beatriz

Thank you Win
 votre commentaire
-

Colybrix, thank you very much for your permission that I may translate your tutorials
tuto original ici
***
***
Plugins
Mehdi
VM Distorsion
Carlaine et Sensibility
Graphic plus
Button et Frame (Unlimited)
***

Color 1 : #673437
Color 2 : #f9ee68
Color 3 : #de4c2b
***
1 - Open the file Alpha – Window – Duplicate (or use the shortcut keys SHIFT + D)
Close the original file, we working on the duplicate
Foreground Color 1
Background Color 2
2 - effects - Mehdi Wavy Lab 1.1 (radial 5 -50)
Color 3 and White in in the two right cases

3 - Adjust - Blur - Gaussian blur 30
4 - Layers - Duplicate
Effects – Plugin Unlimited 2.0 – VM Distorsion - Radiator
Generator 1 à 149 ….... the rest by default

5 - Reduce the opacity to 70 %
Layers - Merge - Merge down
6 - Adjust - Add/Remove noise - Add noise
7 - Selections – Load/Save selection – Load selection from alpha channel
Load selection #1Selections - Promote selection to layer
8 - Effects - Carolaine and Sensibility - CS-LDots by default

9 - Adjust - Sharpness - Sharpen
Select none
Layers - Merge - Merge down
10 - Open the tube landscape (erase the watermark)
Edit- copy - paste like a new layer
Don't move
11 - Effects - Distorsion effects - wind left 100

12 - Effects - Edge effects - Enhance
Reduce the opacity to 56 %
13 - Layers - new layer
Fill the layer with white color
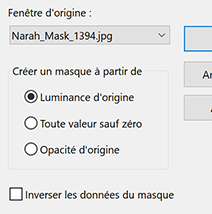
Layers – New mask layer from image – select the mask Narah _mask 1464

Effects - Edge effects - Enhance
Layers - Merge - merge group
15 - Effects - Image effects - Seamless Tiling - Side by side
Effects - Edge effects - Enhance
16 - Change blend mode to Luminance (legacy)
Layers - Arrange Move down
17 - Activate the top layer
18 - Layers - new layer
Fill the layer with white color
Layers – New mask layer from image – select the mask Narah _mask 1394
19 - Effects - Edge effects - Enhance
Layers - Merge - merge group
20- Change blend mode to Luminance (legacy)
For the next steps (21 to 28), my flowers in the material
if you use mine go to step 29
21 - Layers - new layer
Selections – Load/Save selection – Load selection from alpha channel
Load selection #2Fill with color 1
Effects - Graphic Plus - Cross shadow Intensity 100
Selections - select none

23 - Effects - 3D effects - Inner bevel

24 - Layers - new layer
Selections – Load/Save selection – Load selection from alpha channel
Load selection #3Fill with the Color 2
25 - Selections - Select none
Effects - 3D effects - Inner bevel (same settings)
26 -
Layers - new layer
Selections – Load/Save selection – Load selection from alpha channel
Load selection #4Fill with the Color 3
27 -
Selections - Select none
Effects - 3D effects - Inner bevel (same settings)
28 - Layers - merge - merge down (2 times)
Repeat here if you use my flowers (open Flower 1)
Start here is you use my flowers
Open the tube "fleur 1"
Edit - copy - paste like a new layer
29 - Layers - duplicate
Image - Resize to 60 % - resize all layers not checked
30 - Effects - Image effects - Seamless Tiling

31 - Tool select (K)

32 - Resize the original and place it where you want
I resized to 70% and placed in the bottom left corner
33 - (If you wish, you can do the steps again with other colours to decorate your creation).
I put another flower in the material ... I resized it to 70% and moved it on the right side.
I have duplicated and resized the flowers 3 times and moved
34 - Activate the bottom layer (raster 1)
Edit - Copy
35 - Image – Add borders
1 px color 1
3 px color 2
1 px color 1
30 px color 2
36 - Select this border with the magic wand
Edit - Paste in the selection
37 - Adjust - Blur - Gaussian blur 30
38 - Effects - Graphic Plus - Quick Tile 1 (default)
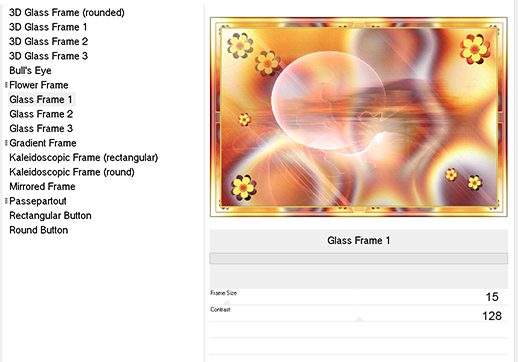
39 - Effects - Plugin Unlimited 2.0 - Buttom and Frame - Glass Frame 1
40 - Selections - Invert
Effects - 3D Effects - Drop Shadow

Selections - Select none
41 - Open the tube "enfant49-coly" ........ erase the watermark
copy and paste as a new layer
Image - Resize to 95 % - resize all layers not checked
42 - Tool select (K)

43 - Effects - 3D Effects - Drop Shadow
44 - Open the tube Title
Copy and paste as a new layer
Tool select (K)

45 - Selesctions - Select all - floating selection - static selection
46 - Activate the bottom layer (raster 1)
Promote selection to layer
Select none
47. You can delete the white text layer (Raster 3).
At this stage we don't see the text that has the background color, it's normal.
Move back to the transformed selection layer (middle layer)
Effects - 3D effects - Inner bevel
Effects - 3D Effects - Drop Shadow
48 - Add your watermark
49 - Image – Add borders
1 px color 1
50 - Image - Resize to 900 pixels
Adjust - Sharpen
If you want, you can send me your version
If you have problems, or you find a not worked link, write to me
Une autre version
 votre commentaire


|
|
|
|